This entry is part 7 of 9 in the User Submitted Image Galleries Series
- User Submitting Gallery Images – Part 1
- User Submitted Gallery Images – Part 2
- User Submitted Image Gallery – Part 3
- User Submitted Image Gallery – Part 4
- User Submitted Image Gallery – Part 5
- User Submitted Image Gallery – Part 6
- User Submitted Image Gallery – Part 7
- User Submitted Image Gallery – Part 8
- User Submitted Image Gallery – Final Overview
Part 7 of our User Submitted Image Gallery tutorial series is going to demonstrate how to customize the dashboard columns of our image post type, and also how to add a new widget to our dashboard that displays the latest pending image submissions. In this part we are really focusing on two customizations to the WordPress dashboard that let us take our plugin to the next level by dramatically improving the user experience of the person performing gallery moderation.
Adding Custom Dashboard Columns to the Gallery Images Post Type
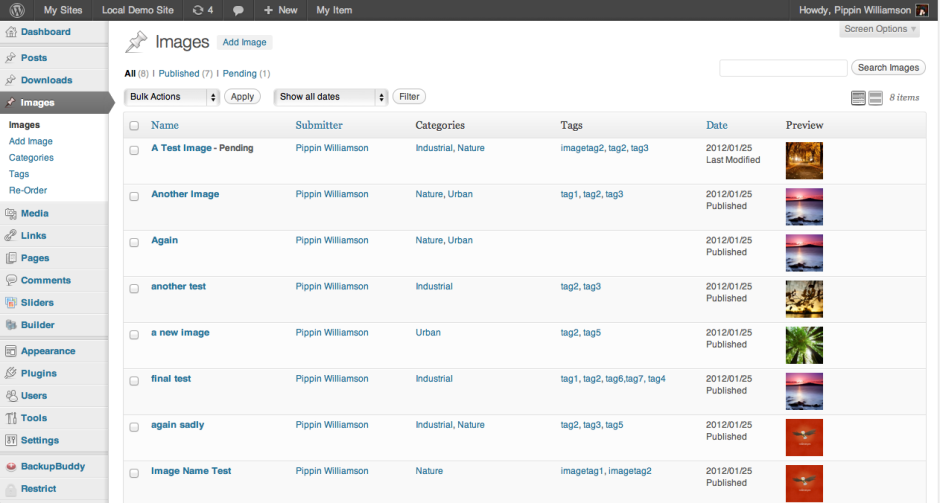
By adding custom columns to the images post type list, we can make it much easier for administrators to moderate and find images in the list. We are also able to tailor the names of the columns a little bit to better suit our needs. Since we are building a user submitted image gallery, the title “Author” is not nearly as appropriate as “Submitter”. The lack of a column that displays a thumbnail preview is also limiting.
The columns we are going to have when finished are:
- Name – the name of the image
- Submitter – the name of the person that submitted the image
- Categories – the categories the image is filed in
- Tags – the tag keywords applied to the image
- Date – the date the image was approved
- Preview – a thumbnail preview of the image
If you’re not quite sure what I’m talking about when I say “custom columns”, then the following screenshot should help:
There are just wo functions needed to setup our custom columns, and we are going to place both of them into a file called dashboard-columns.php, which is inside of the includes/ directory. Create the file, then place the necessary include() into the main plugin file, just as we have done several times before:
1 | include(UIG_PLUGIN_DIR . '/includes/dashboard-columns.php'); |
The way that we register custom columns is by using the manage_edit-{post type name}_columns filter. This allows us to modify the columns for our specific post type. With this filter, we will register our custom columns, and also define the titles for the columns:
1 2 3 4 5 6 7 8 9 10 11 12 13 14 | // define the custom columns and the order of the columns function uig_edit_columns($columns){ $image_columns = array( 'cb' => '<input type="checkbox"/>', 'title' => __('Name', 'uig'), 'author' => __('Submitter', 'uig'), 'image_categories' => __('Categories', 'uig'), 'image_tags' => __('Tags', 'uig'), 'date' => __('Date', 'uig'), 'thumbnail' => __('Preview', 'uig') ); return $columns; } add_filter('manage_edit-uig_image_columns', 'uig_edit_columns'); |
An array of the existing columns is passed to the function, which we promptly overwrite with an array of our own. Each key of the array represents the column ID, and the value of the key represents the title of the column, so it goes “id” => “title”. The order in which we place the columns in the array is also the order that they are displayed in.
We now need a function that will render the content of the custom columns. Note that we do not have to include anything to render the contents of the default columns; these are handled automatically by WordPress, even though we have changed the names of some of the theme (such as Title, which was changed to Name).
The column content is defined with the manage_posts_custom_column. This one is not post type specific, which is why we have a conditional statement to ensure we only modify content for our images post type.
1 2 3 4 5 6 7 8 9 10 11 12 13 14 15 16 17 | // render the custom column content function uig_render_post_columns($column_name, $post_id) { if(get_post_type($post_id) == 'uig_image') { switch ($column_name) { case 'thumbnail': echo get_the_post_thumbnail($post_id, array(50,50)); break; case 'image_categories': echo get_the_term_list($post_id, 'uig_image_category', '', ', ', ''); break; case 'image_tags': echo get_the_term_list($post_id, 'uig_image_tag', '', ', ', ''); break; } } } add_action('manage_posts_custom_column', 'uig_render_post_columns', 10, 2); |
This function works with a simple switch statement that allows us to echo specific content for each column type.
When we are on the “thumbnail” column, we use get_the_post_thumbnail() function to render the image thumb.
When we are on the “categories” and “tags” columns, we use get_the_term_list() to pull in the taxonomy terms applied to the image and then display them in a comma-separated list.
That’s it, the custom columns are done.
Setting Up The Custom Pending Images Dashboard Widget
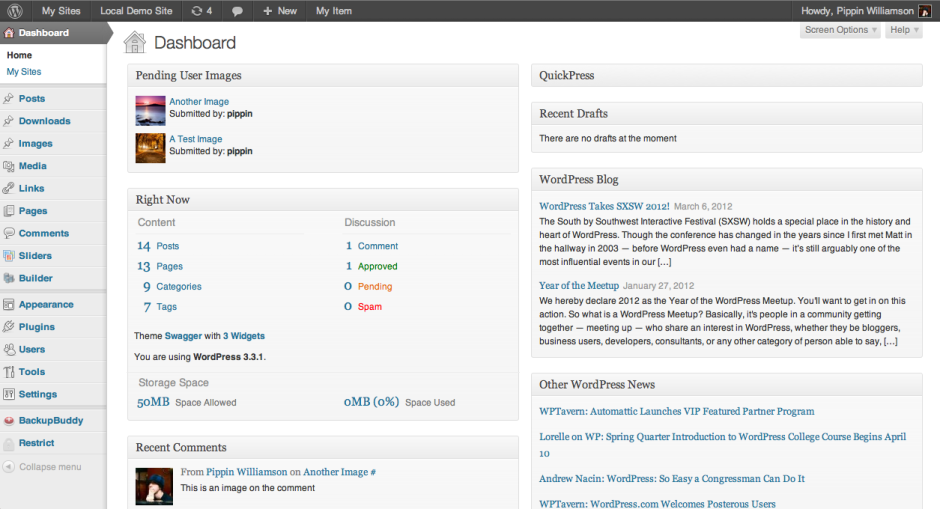
To make the process of moderation and maintenance of the gallery a little easier for site admins, we are going to setup a custom dashboard widget that will show the latest images submitted to the gallery that have not yet been approved.
The widget will look like this:
Similar to how we did the dashboard columns, we’re going to place the code for our widget in a new file called dashboard-widgets.php. Once you have created the file, make sure that you include it, like so:
1 | include(UIG_PLUGIN_DIR . '/includes/dashboard-widgets.php'); |
Inside of the dashboard-widgets.php file now, place this:
1 2 3 4 5 | // register the custom "pending images" dashboard widget function uig_dashboard_widgets() { wp_add_dashboard_widget('uig_dashboard_widget', __('Pending User Images', 'uig'), 'uig_dashboard_widget_render'); } add_action('wp_dashboard_setup', 'uig_dashboard_widgets'); |
This uses the wp_add_dashboard_widget() function to register a new widget that has an ID of “uig_dashboard_widget”, a title of “Pending User Images”, and a callback function (for rendering the content) of uig_dashboard_widget_render().
We now write the function that renders the content. This is pretty simple and nothing more than a get_posts() query that pulls in the latest images that have a status of “pending”.
1 2 3 4 5 6 7 8 9 10 11 12 13 14 15 16 17 18 19 20 21 | // render the "pending images" dashboard widget function uig_dashboard_widget_render() { $image_args = array('post_type' => 'uig_image', 'post_status' => 'pending', 'posts_per_page' => -1); $images = get_posts($image_args); echo '<ul>'; if($images) { foreach($images as $image) { $author = get_userdata($image->post_author); echo '<li style="height: 40px; margin: 0 0 10px;">'; echo '<div style="float: left;margin: 0 5px 0 0;">' . get_the_post_thumbnail($image->ID, array(40,40)) . '</div>'; echo '<a href="wp-admin/post.php?post=' . $image->ID . '&action=edit">' . $image->post_title . '</a><br/>'; echo 'Submitted by: <strong>' . $author->user_login . '</strong>'; echo '</li>'; } } else { echo '<li>' . __('No pending images', 'uig') . '</li>'; } echo '</ul>'; } |
We setup the parameters for our query with the $image_args array, then pass it to get_posts(), which returns an array of post objects. After we have the pending images, we loop through each one of them using foreach() and display the thumbnail, the submitter’s name, and the image’s name, which is linked to its edit page.
All of the information is outputted in a plain unordered list.
If there are no pending images awaiting approval, we display the “No pending images” messages.


