This entry is part 2 of 4 in the Unit Tests for WordPress Plugins Series
- Unit Tests for WordPress Plugins – An Introduction
- Unit Tests for WordPress Plugins – Setting Up Our Testing Suite
- Unit Tests for WordPress Plugins – Writing Tests
- Unit Tests for WordPress Plugins – The Factory
In part one of this tutorial series we briefly looked at what unit tests are and we walked through a couple of simple examples to illustrate how we can use them to help ensure our code is working properly. Now it is time to actually setup our testing suite and run our first unit test.
There are quite a few different ways to setup unit tests in your WordPress plugins, but by far the easiest is through WP-CLI, a command line interface for WordPress. Due to its simplicity, we will use WP-CLI to setup our unit tests in this tutorial.
If you are not familiar with or comfortable with the command line, you might be tempted to walk away from unit tests now and maybe come back another day. I am going to try and keep this as simple as possible, so I’d encourage you to stick with me as you will quickly find that the command line is not nearly as scary or difficult as some make it out to be.
Note: WP-CLI requires a unix-based operating system like Mac OS X or Linux. Once our testing suite is setup, everything will be almost identical for all users, but only Linux and Mac OS X users can utilize the WP-CLI tool.
What is a testing suite?
The phrase “testing suite” simply refers to our collection of unit tests and our configuration for those unit tests. When we say that we are going to setup the testing suite, we mean that we are going to install PHPUnit (or similar), we are going to create our configuration file, and we are going to write our initial unit tests.
Watch the video below for a quick example of what running our unit tests looks like:
Once we are done with the steps below, we should be able to run the phpunit command from our plugin’s directory and have our unit tests run.
For this tutorial series, we are going to write unit tests for my Restrict Content Pro plugin.
1. Install PHPUnit
The first thing we need to do is install PHPUnit. The readme file in the Github repository for PHPUnit has the instructions on how to do this.
Simply follow the installation instructions on the Github page and then proceed to the next step below.
If you run into any issues installing PHPUnit, leave a comment below and I will do my best to help you.
2. Install WP-CLI
WP-CLI is also exceptionally simple to install, and you can find the install instructions here.
If you run into any issues installing WP-CLI, leave a comment below and I will do my best to help you.
3. Use WP-CLI to setup our plugin’s unit tests
Now we are almost ready to really get into the fun part of unit tests: actually seeing our unit tests run. Before we do that, however, we need to utilize WP-CLI to create our initial unit tests configuration.
Since I’m doing this along with you for my Restrict Content Pro plugin, I will continually refer to Restrict Content Pro (or RCP). Anytime I do, just substitute in your own plugin’s name.
WP-CLI includes a step-by-step guide of how to setup unit tests in your plugin, but I’m going to walk through it here as well.
First, we need to open the command line and navigate to our WordPress install’s main directory. Your exact file path will be different than mine, so be sure to adjust for where you have WordPress installed.
cd sites/wordpress/
Second, we need to instruct WP-CLI to create the initial unit test files for us:
wp scaffold plugin-tests restrict-content-pro
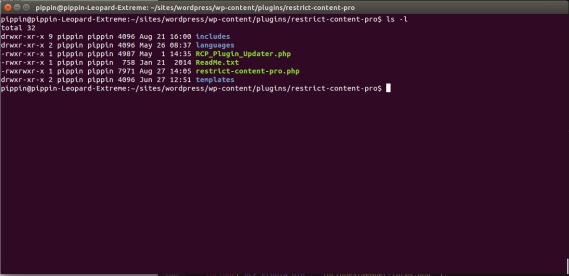
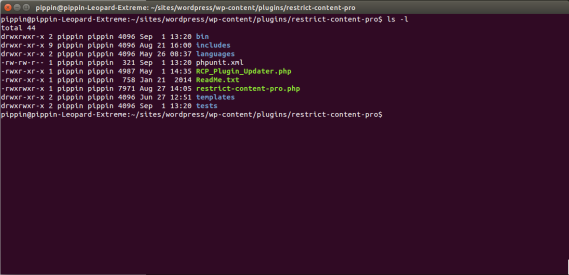
This will generate all of the files needed for our unit tests. If you now navigate to your plugin’s folder and type ls -l, you will see several new files and folders added.
cd wp-content/plugins/restrict-content-pro
ls -l
Before:
After:
The new folders / files created:
- bin/
- install-wp-tests.sh
- tests/
- bootstrap.php
- test-sample.php
- phpunit.xml
- .travis.yml
These files are the foundation of our plugin’s test suite.
Now, run this command:
bash bin/install-wp-tests.sh wordpress_test root '' localhost latest
Replace “root” with the username of your database and replace ” with the database password. Also replace “localhost” with the hostname of your database. You can find all three of these values in your wp-config.php file.
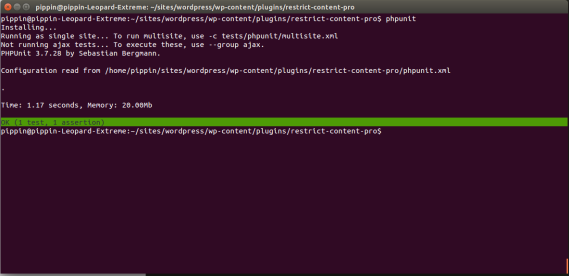
You can now type phpunit into the command line and the unit tests will run:
phpunit
The testing suite that WP-CLI sets up for us includes one sample unit test, which you can see was run successfully. Let’s take a look at the sample test. It is located in tests/test-sample.php:
class SampleTest extends WP_UnitTestCase { function testSample() { // replace this with some actual testing code $this->assertTrue( true ); } } |
If you look at what this test does, you will probably notice that it isn’t really testing anything useful. It simple checks if true is equal to true, which we know it is, but it provides a nice example that is easy to follow.
Now our testing suite is setup and we are ready to begin writing our own tests.
4. Writing your first test
Before we jump into writing an actual unit test, let’s first look how PHPUnit knows what to execute as unit tests. The phpunit.xml file is the main configuration file that instructs PHPUnit on what to do. By default, it looks like this:
<phpunit
	bootstrap="tests/bootstrap.php"
	backupGlobals="false"
	colors="true"
	convertErrorsToExceptions="true"
	convertNoticesToExceptions="true"
	convertWarningsToExceptions="true"
	>
	<testsuites>
		<testsuite>
			<directory prefix="test-" suffix=".php"d>./tests/</directory>
		</testsuite>
	</testsuites>
</phpunitd>
This tells PHPUnit where to look for the PHP file that gets everything running (tests/bootstrap.php), defines a few options, and then also tells PHPUnit where the actual unit tests live. In this case, the unit tests live in the tests directory and are all of the .php files prefixed with test-. This means that any file we place in the tests directory and name test-something.php will be considered unit tests. This allows us to easily organize our unit tests into groups, which we will discuss more later.
Note: only methods prefixed with “test” will be considered a unit test. All other methods will be skipped.
Let’s write a quick sample test now to help get a better grasp of what we’re doing. This test won’t do much meaningful, beyond providing a nice example.
To write a new test, all we need to do is create a new method inside the SampleTest class, like this:
function test_sample_string() { $string = 'Unit tests are sweet'; $this->assertEquals( 'Unit tests are sweet', $string ); } |
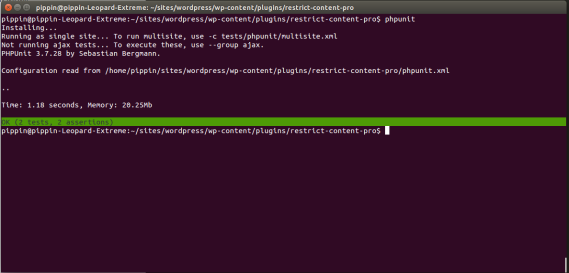
This does nothing more than setup a variable called $string, set its value to “Unit tests are sweet”, and then checks that “Unit tests are sweet” is indeed equal to the $string variable. If we now run PHPUnit, we will see that we have two tests and both are passing successfully:
Awesome! We have now written a successful unit test. That’s awesome and you are now a heck of a lot further along on your journey to understanding and utilizing unit tests than a huge number of developers.
Let’s now do another quick demonstration. Change our test_sample_string() test to this:
function test_sample_string() { $string = 'Unit tests are sweet'; $this->assertEquals( 'Failing Unit tests are sad', $string ); } |
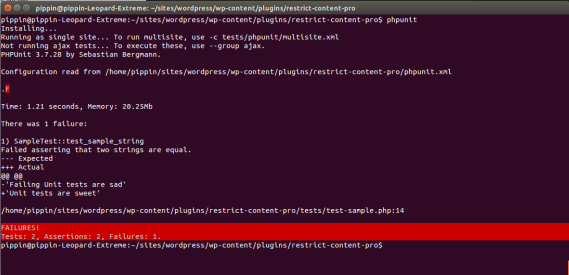
And now run phpunit again:
Our simple unit test now fails because we are trying to assert that two very-non-equal strings are equal to each other. Since the two strings are not the same, our test fails, and PHPUnit tells us that, including why it failed and the exact line number that failed.
When writing unit tests, there are two main terms we often use to describe what we are doing: “tests” and “assertions”. A “test” is a collection of assertions and an assertion is one check within a test. Each test must contain at least one assertion but a test may also contain many assertions. The sample test we wrote above contains one assertion.
We will learn more about writing tests and assertions in the next part of this series.


Thanks for the nice tutorial !
When I type “wp scaffold plugin-tests my-plugin” I get following error and no files are generated:
Your PHP installation appears to be missing the MySQL extension which is required by WordPress
How to fix this ? Please help
Take a look at this forum post: https://wordpress.org/support/topic/your-php-installation-appears-to-be-missing-the-mysql-extension-which-is-require-33/ – It has several solutions in it.
Really useful. Bugs can pop up over time and having such a tool can be really useful to find out where the issues are. Nice work!
bin/install-wp-tests.sh: line 82: svn: command not found
Any workaround for git only installations, or is svn an undeclared dependency?
I’m working on a Ubuntu 16 VM
This appears to be a workaround:
#svn co –quiet https://develop.svn.wordpress.org/${WP_TESTS_TAG}/tests/phpunit/includes/ $WP_TESTS_DIR/includes
#svn co –quiet https://develop.svn.wordpress.org/${WP_TESTS_TAG}/tests/phpunit/data/ $WP_TESTS_DIR/data
git clone https://develop.svn.wordpress.org/${WP_TESTS_TAG}/tests/phpunit/includes/ $WP_TESTS_DIR/includes
git clone https://develop.svn.wordpress.org/${WP_TESTS_TAG}/tests/phpunit/data/ $WP_TESTS_DIR/data
But I am largely bash illiterate so who knows? A database wordpress_test was created though.
Even after installing svn I get:
require_once(/tmp/wordpress-tests-lib/includes/functions.php): failed to open stream
You have to run again bash bin/install-wp-tests.sh wordpress_test root ” localhost
/tmp/wordpress-tests-lib/ is temporary installation
Thanks for great tutorial Pippin
For addition to Andrzej’s reply, I had to remove wordpress-tests-lib directory before rerun bash command.
The command would be then:
rm -rf /tmp/wordpress-tests-lib; bash bin/install-wp-tests.sh wordpress_test root ” localhost latest
The command is from danielbachhuber’s reply at: https://github.com/wp-cli/wp-cli/issues/1938#issuecomment-124237542
Thanks for the fantastic guide! I initially had no problem setting this up, however, now when I try to run phpunit I receive an error on line 14 of the bootstrap.php file. I did not receive this before and I am not sure how to resolve this.
minor fix: before wp scaffold you to mkdir plugin directory first
This was so easy to follow, thank you for taking the time to write this with such detail.
One minor change that needs to be corrected as it can throw someone off:
https://drive.google.com/open?id=19rFzWL7_9eEzZpO8pMydHvupKUtSogZ7
Just for your information if you get an issue that no test ran it may be because it is excluded in the phpunit.xml.dist file which is installed in the plugin folder.
Then how to include that file?
When I type phpunit, it shows the following
PHPUnit 3.7.28 by Sebastian Bergmann.
Usage: phpunit [switches] UnitTest [UnitTest.php]
phpunit [switches]
–log-junit Log test execution in JUnit XML format to file.
–log-tap Log test execution in TAP format to file.
–log-json Log test execution in JSON format.
–coverage-clover Generate code coverage report in Clover XML format.
–coverage-html Generate code coverage report in HTML format.
–coverage-php Serialize PHP_CodeCoverage object to file.
–coverage-text= Generate code coverage report in text format.
Default to writing to the standard output.
–testdox-html Write agile documentation in HTML format to file.
–testdox-text Write agile documentation in Text format to file.
–filter Filter which tests to run.
–testsuite Filter which testsuite to run.
–group … Only runs tests from the specified group(s).
–exclude-group … Exclude tests from the specified group(s).
–list-groups List available test groups.
–test-suffix … Only search for test in files with specified
suffix(es). Default: Test.php,.phpt
–loader TestSuiteLoader implementation to use.
–printer TestSuiteListener implementation to use.
–repeat Runs the test(s) repeatedly.
–tap Report test execution progress in TAP format.
–testdox Report test execution progress in TestDox format.
–colors Use colors in output.
–stderr Write to STDERR instead of STDOUT.
–stop-on-error Stop execution upon first error.
–stop-on-failure Stop execution upon first error or failure.
–stop-on-skipped Stop execution upon first skipped test.
–stop-on-incomplete Stop execution upon first incomplete test.
–strict Run tests in strict mode.
-v|–verbose Output more verbose information.
–debug Display debugging information during test execution.
–process-isolation Run each test in a separate PHP process.
–no-globals-backup Do not backup and restore $GLOBALS for each test.
–static-backup Backup and restore static attributes for each test.
–bootstrap A “bootstrap” PHP file that is run before the tests.
-c|–configuration Read configuration from XML file.
–no-configuration Ignore default configuration file (phpunit.xml).
–include-path Prepend PHP’s include_path with given path(s).
-d key[=value] Sets a php.ini value.
-h|–help Prints this usage information.
–version Prints the version and exits.