This entry is part 2 of 9 in the Integrating Stripe.com with WordPress Series
- Stripe Integration Part 1 – Building the Settings and a Simple Payment Form
- Stripe Integration Part 2 – Recurring Payments
- Stripe Integration Part 3 – Variable Prices and Enhanced Plan Handling
- Stripe Integration Part 4 – Multiple Recurring Payment Options
- Stripe Integration Part 5 – Accepting Discount Codes
- Stripe Integration Part 6 – Payment Receipts
- Stripe Integration Part 7 – Creating and Storing Customers
- Stripe Integration Part 8 – Working with Invoices
- Stripe Integration Part 9 – The Stripe Button
In part 1 of this Integrating Stripe.com with WordPress tutorial series we built a simple payments form. Now we are going to extend our payment form a little bit to allow users to signup for a recurring payment. In the first part we only processed one time payments, but once this section is done, we will be able to setup charges for our customers that automatically renew (or re-charge) each month.
We are going to use the same code base that we built in part 1, so if you haven’t gone through that yet, please do before continuing.
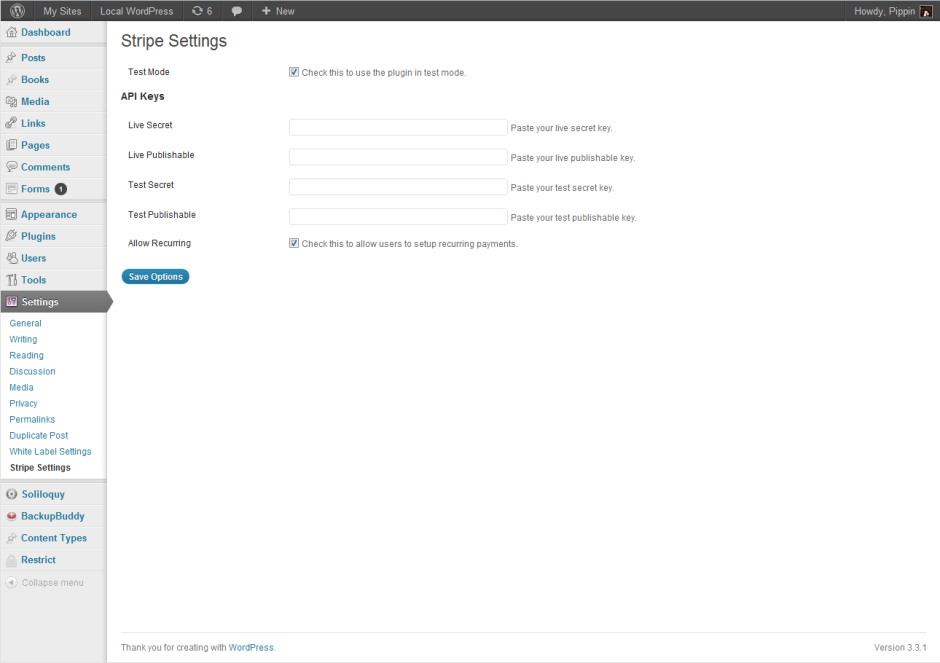
The very first thing we will do is add an option to our settings page that allows the option for recurring payments to be turned on and off.
To add the option for recurring payments, options includes/settings.php and add this below the API keys section:
1 2 3 4 5 6 7 8 9 10 11 12 13 | <table class="form-table"> <tbody> <tr valign="top"> <th scope="row" valign="top"> <?php _e('Allow Recurring', 'pippin_stripe'); ?> </th> <td> <input id="stripe_settings[recurring]" name="stripe_settings[recurring]" type="checkbox" value="1" <?php checked(1, $stripe_options['recurring']); ?> /> <label class="description" for="stripe_settings[recurring]"><?php _e('Check this to allow users to setup recurring payments.', 'pippin_stripe'); ?></label> </td> </tr> </tbody> </table> |
Your settings page should now look like this:

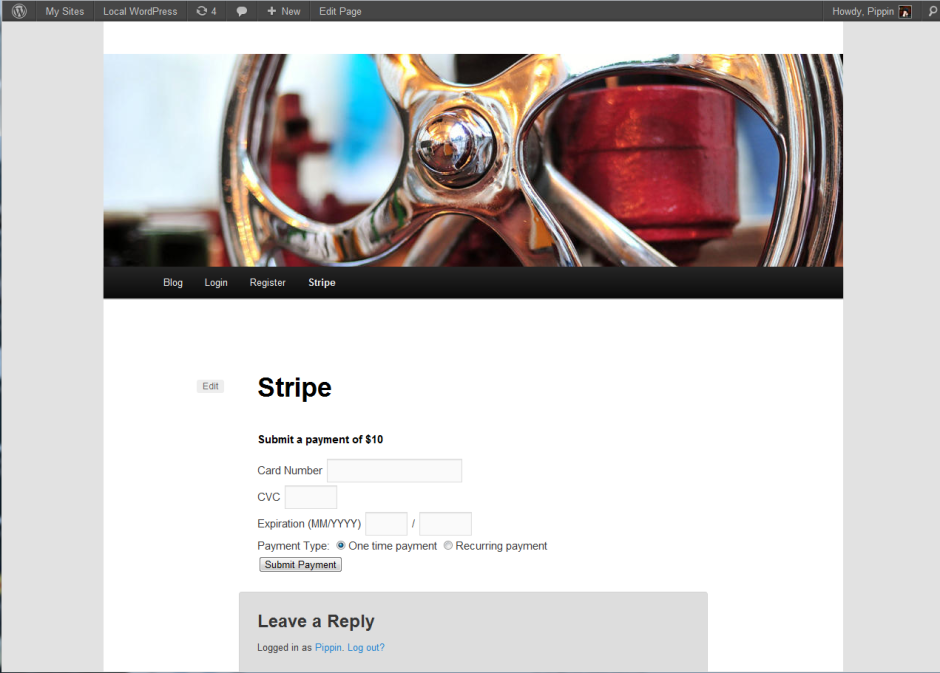
When this option is enabled, the user (the one making the payment) will have the option of choosing what kind of payment the want to make, so this means that we need to now ad an option to our payment form. We will add this option as a set of radio buttons, and the user will then choose which payment kind to make, either “one time” or “recurring”.
Open includes/shortcodes.php and place this additional HTML just above the hidden input fields:
1 2 3 4 5 6 7 | <?php if(isset($stripe_options['recurring'])) { ?> <div class="form-row"> <label><?php _e('Payment Type:', 'pippin_stripe'); ?></label> <input type="radio" name="recurring" value="no" checked="checked"/><span><?php _e('One time payment', 'pippin_stripe'); ?></span> <input type="radio" name="recurring" value="yes"/><span><?php _e('Recurring monthly payment', 'pippin_stripe'); ?></span> </div> <?php } ?> |
When the recurring option is enabled, this will render like so:
Since we are checking for the value of one of our settings in the short code, we also need to add this to the top of the short code function:
1 | global $stripe_options; |
All together, our shortcode looks like this:
1 2 3 4 5 6 7 8 9 10 11 12 13 14 15 16 17 18 19 20 21 22 23 24 25 26 27 28 29 30 31 32 33 34 35 36 37 38 39 40 | function pippin_stripe_payment_form() {
global $stripe_options;
if(isset($_GET['payment']) && $_GET['payment'] == 'paid') {
echo '<p class="success">' . __('Thank you for your payment.', 'pippin_stripe') . '</p>';
} else { ?>
<h2><?php _e('Submit a payment of $10', 'pippin_stripe'); ?></h2>
<form action="" method="POST" id="stripe-payment-form">
<div class="form-row">
<label><?php _e('Card Number', 'pippin_stripe'); ?></label>
<input type="text" size="20" autocomplete="off" class="card-number"/>
</div>
<div class="form-row">
<label><?php _e('CVC', 'pippin_stripe'); ?></label>
<input type="text" size="4" autocomplete="off" class="card-cvc"/>
</div>
<div class="form-row">
<label><?php _e('Expiration (MM/YYYY)', 'pippin_stripe'); ?></label>
<input type="text" size="2" class="card-expiry-month"/>
<span> / </span>
<input type="text" size="4" class="card-expiry-year"/>
</div>
<?php if(isset($stripe_options['recurring'])) { ?>
<div class="form-row">
	<label><?php _e('Payment Type:', 'pippin_stripe'); ?></label>
	<input type="radio" name="recurring" value="no" checked="checked"/><span><?php _e('One time payment', 'pippin_stripe'); ?></span>
	<input type="radio" name="recurring" value="yes"/><span><?php _e('Recurring monthly payment', 'pippin_stripe'); ?></span>
</div>
<?php } ?>
<input type="hidden" name="action" value="stripe"/>
<input type="hidden" name="redirect" value="<?php echo get_permalink(); ?>"/>
<input type="hidden" name="stripe_nonce" value="<?php echo wp_create_nonce('stripe-nonce'); ?>"/>
<button type="submit" id="stripe-submit"><?php _e('Submit Payment', 'pippin_stripe'); ?></button>
</form>
<div class="payment-errors"></div>
<?php
}
}
add_shortcode('payment_form', 'pippin_stripe_payment_form'); |
Now we need to add a check to our processing function to determine the kind of payment that is being submitted. We have to do this because the way a recurring payment is setup is very different than how a single charge is processed. So the workflow will be as such:
RECURRING = YES or NO
IF(RECURRING) {
// process recurring here
} ELSE {
// process one time charge here, just like in part 1
}
This conditional will happen inside of includes/process-payment.php, so open that file at this time.
We will start by adding a conditional check for the selected payment type at line 20, just above the TRY statement. The basic conditional looks like this:
1 2 3 4 5 | if(isset($_POST['recurring']) && $_POST['recurring'] == 'yes') { // recurring charge here } else { // regular charge here } |
When combined with the rest of our function, we have this:
1 2 3 4 5 6 7 8 9 10 11 12 13 14 15 16 17 18 19 20 21 22 23 24 25 26 27 28 29 30 31 32 33 34 35 36 37 38 39 40 41 42 43 44 45 46 47 48 49 | function pippin_stripe_process_payment() { if(isset($_POST['action']) && $_POST['action'] == 'stripe' && wp_verify_nonce($_POST['stripe_nonce'], 'stripe-nonce')) { global $stripe_options; // load the stripe libraries require_once(STRIPE_BASE_DIR . '/lib/Stripe.php'); // retrieve the token generated by stripe.js $token = $_POST['stripeToken']; // check if we are using test mode if(isset($stripe_options['test_mode']) && $stripe_options['test_mode']) { $secret_key = $stripe_options['test_secret_key']; } else { $secret_key = $stripe_options['live_secret_key']; } if(isset($_POST['recurring']) && $_POST['recurring'] == 'yes') { // process a recurring payment // recurring payment setup will go here } else { // process a one-tiome payment // attempt to charge the customer's card try { Stripe::setApiKey($secret_key); $charge = Stripe_Charge::create(array( 'amount' => 1000, // $10 'currency' => 'usd', 'card' => $token ) ); // redirect on successful payment $redirect = add_query_arg('payment', 'paid', $_POST['redirect']); } catch (Exception $e) { // redirect on failed payment $redirect = add_query_arg('payment', 'failed', $_POST['redirect']); } } // redirect back to our previous page with the added query variable wp_redirect($redirect); exit; } } add_action('init', 'pippin_stripe_process_payment'); |
Note line 19-22.
All we need to do now is add the Stripe API call for creating the recurring payment. The one time payment uses the Stripe_Charge function; to setup a recurring payment, we will use Stripe_Customer.
The Stripe_Customer function is extremely simple and only requires two things (for our scenario):
- a card token (created with Stripe.js, which was done in part 1)
- a plan ID (created in your Stripe account manually)
The function for creating the recurring customer will look like this:
1 2 3 4 5 | $customer = Stripe_Customer::create(array( 'card' => $token, 'plan' => 'your_stripe_plan_id' ) ); |
Now combined with our entire processing function, we have this:
1 2 3 4 5 6 7 8 9 10 11 12 13 14 15 16 17 18 19 20 21 22 23 24 25 26 27 28 29 30 31 32 33 34 35 36 37 38 39 40 41 42 43 44 45 46 47 48 49 50 51 52 53 54 55 56 57 58 59 60 61 62 63 | function pippin_stripe_process_payment() { if(isset($_POST['action']) && $_POST['action'] == 'stripe' && wp_verify_nonce($_POST['stripe_nonce'], 'stripe-nonce')) { global $stripe_options; // load the stripe libraries require_once(STRIPE_BASE_DIR . '/lib/Stripe.php'); // retrieve the token generated by stripe.js $token = $_POST['stripeToken']; // check if we are using test mode if(isset($stripe_options['test_mode']) && $stripe_options['test_mode']) { $secret_key = $stripe_options['test_secret_key']; } else { $secret_key = $stripe_options['live_secret_key']; } Stripe::setApiKey($secret_key); if(isset($_POST['recurring']) && $_POST['recurring'] == 'yes') { // process a recurring payment // recurring payment setup will go here try { $customer = Stripe_Customer::create(array( 'card' => $token, 'plan' => 'your_stripe_plan_id' ) ); // redirect on successful recurring payment setup $redirect = add_query_arg('payment', 'paid', $_POST['redirect']); } catch (Exception $e) { // redirect on failure $redirect = add_query_arg('payment', 'failed', $_POST['redirect']); } } else { // process a one-tiome payment // attempt to charge the customer's card try { $charge = Stripe_Charge::create(array( 'amount' => 1000, // $10 'currency' => 'usd', 'card' => $token ) ); // redirect on successful payment $redirect = add_query_arg('payment', 'paid', $_POST['redirect']); } catch (Exception $e) { // redirect on failed payment $redirect = add_query_arg('payment', 'failed', $_POST['redirect']); } } // redirect back to our previous page with the added query variable wp_redirect($redirect); exit; } } add_action('init', 'pippin_stripe_process_payment'); |
That’s it, you now have a fully functional payment form that users can user to send you a payment, with the option of the payment being one time or recurring.
Note that will have to create the payment plan in Stripe manually. The one time charge is currently set at $10, so you should set your plan to be for $10 charged each month, at least for the purposes of this tutorial.
It’s really quite easy to create plans automatically through the Stripe API, but that is for a later part of this series.
You can download the complete source code for part 2 below.
[download id=”39″ format=”1″]


hi
may I know how to store customer details in database after successfull payment in recurring payments..
thanks
Ishak
The easiest way will be to use functions like get_user_meta(), add_user_meta(), and update_user_meta().
Are you familiar with those functions?
Hi pippin,
Thanks for ur reply I am familiar with those functions but I am asking about how to get successfull paid response from stripe payment gateway because I want to store it into database which is like name – logged user name ,e – mail – logged user email , status -> ? ( like paid or pending from response)
thanks
Ishaks
hi pippin
I am waiting for ur answer
thanks
Sorry for the slow reply. When using recurring payments, you have to use Stripe’s “webhook” system (which I will cover in a later part of this series). You can read about the webhook system here: https://stripe.com/docs/webhooks
Thanks a lot for ur reply Pippin
Yes i need the same thing,just like paypal
mysite – > payement -> after payment back to mysite -> a response of payment status(completed,pending,cancelled etc.) -> store that status to database
is that available?
That’s not how Stripe functions.
I’m not saying that i want the exact “function”.
What i want is the simliar functionality…not exact..
i want payment status,from return URL to store it in database..is it possible?
Oh, got it. Yes you can do that. You need to use the Stripe Webhook system: https://stripe.com/docs/webhooks
Hi. I modified your code to allow some variables to be passed in.. for instance:
[payment_form recurring=1 priv_key=”PRIV_KEY_WHICH_GETS_ENCRYPTED” pub_key=”PUB_KEY” recurring_plan=”YOUR_RECURRING_PLAN”]
[payment_form recurring=0 priv_key=”PRIV_KEY_WHICH_GETS_ENCRYPTED” pub_key=”PUB_KEY” amount=1000]
Be sure to activate the “Encryption” plugin as well.
http://www.otleylogic.com/screenshots/wordpress-stripe-integration-IyztoShc2b.zip
What if not using wordpress? Any helpfr straight html?
hi pippin,
i’m not using word press, can i get any help for php, mainly for recurring payments how to handle them with database or refer any tutorial you know
Thanks for any help,
If you have specific questions, sure, I’ll be happy to try and answer them for you.
Hi Pippin,
Thanks for tutorial, i am able to charge customer with recurring payment setup, but how can i track transaction on site.
I mean i have a database and a page where users can see their transaction history but after first transaction ( that is done through system ) no transaction details is saved in database.
Is there any method to get all transaction details for a user and maintain them in system database ?
You will need to setup a “listener” that detects when Stripe sends a webhook to your site. Anytime a webhook indicating a successful charge is sent, you record a transaction.
Hi,
Thanks for the blog it is very helpful.
Is this possible to the form in pop window instead new page or post,
Thanks
Mohsin
Take a look at Stripe Checkout (it’s talked about in a later part of the series).
Hi Pippin,
I want to know that how we can trigger recurring next payment in stripe…
You can do that by creating an invoice, possibly adding invoice items, then triggering a payment for the invoice.
hi,
Thanks for sharing your efforts with us. This helps alot. In the 2nd part i am receiving this error on backend.
Notice: Undefined index: recurring in /home/vdmxoipt/public_html/wp-content/plugins/wordpress-stripe-integration/includes/settings.php on line 80
/> Check this to allow users to setup recurring payments.
I still can check but the radio options are not visible on payment page. Any idea!
Hi, how are you?
I have a problem, my shortcodes don’t appear in the form. When im trying to put the shortcodes form in the page only appear quantity and description of product not: number card cvv expiration..
what I should do?
thank u very much