This entry is part 1 of 9 in the Integrating Stripe.com with WordPress Series
- Stripe Integration Part 1 – Building the Settings and a Simple Payment Form
- Stripe Integration Part 2 – Recurring Payments
- Stripe Integration Part 3 – Variable Prices and Enhanced Plan Handling
- Stripe Integration Part 4 – Multiple Recurring Payment Options
- Stripe Integration Part 5 – Accepting Discount Codes
- Stripe Integration Part 6 – Payment Receipts
- Stripe Integration Part 7 – Creating and Storing Customers
- Stripe Integration Part 8 – Working with Invoices
- Stripe Integration Part 9 – The Stripe Button
Stripe.com offers a very powerful system for accepting payments, including subscriptions. One of the particularly great things about Stripe is how easy its API is to use and integrate into your own projects. This tutorial series is going to walk you through many of the necessary steps for integrating Stripe, and many of its quality features, into WordPress. In this first part, we will look at setting up are basic plugin structure and building a very simple payment form. The payment form will allow users to submit a payment of a pre-defined amount to your Stripe.com account.
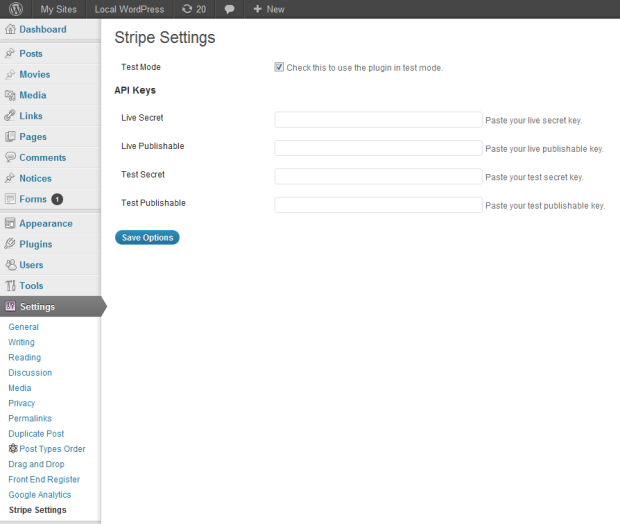
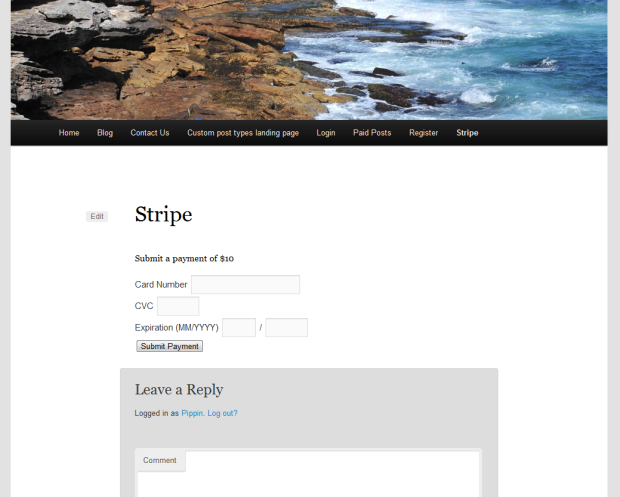
Throughout this series, we will create a complete (though perhaps disjointed) plugin that will be able to perform most of the functions Stripe offers. For this first part, we’re going to build the basic plugin structure and a simple payment form. Once we are done, we will have a settings page and a short code to display the payment form, both of which are illustrated in the screenshots below:
Getting Started
As always, a good way to start a plugin is to build the folder structure. For this Stripe integration plugin, our folder structure looks like this:
- wordpress-stripe-integration
- includes
- languages
- wordpress-stripe-integration.php
Once we have our basic plugin structure, we need to go and download the Stripe PHP API libraries. You can do that from the Stripe libraries page. Once you have downloaded them, extract the file and place the lib folder into our root plugin directory. Our plugin folder should now be:
- wordpress-stripe-integration
- includes
- languages
- lib
- wordpress-stripe-integration.php
The next couple steps in this tutorial will be focusing on getting the non-Stripe aspects out of the way. This includes our main plugin file, our short code, and our settings page. Once all of those are setup, we will integrate the Stripe portion.
Building the Main Plugin File
Since this tutorial series is focusing on how to use the Stripe API, I’m not going to walk you through exactly how to build every element of our plugin, not when they are standard elements that are included in nearly every other plugin. I want to, instead, explain in detail how the aspects that deal directly with Stripe work, but show you the regular WordPress elements as well so that you can gain a really good grasp of how this integration works.
The complete code for our root plugin file is below:
1 2 3 4 5 6 7 8 9 10 11 12 13 14 15 16 17 18 19 20 21 22 23 24 25 26 27 28 29 30 31 32 33 34 35 36 37 38 39 40 41 42 43 | <?php /* Plugin Name: WordPress Stripe Integration Plugin URI: https://pippinsplugins.com/ Description: A plugin to illustrate how to integrate Stripe and WordPress Author: Pippin Williamson Author URI: https://pippinsplugins.com COntributors: mordauk Version: 1.0 */ /********************************** * constants and globals **********************************/ if(!defined('STRIPE_BASE_URL')) { define('STRIPE_BASE_URL', plugin_dir_url(__FILE__)); } if(!defined('STRIPE_BASE_DIR')) { define('STRIPE_BASE_DIR', dirname(__FILE__)); } $stripe_options = get_option('stripe_settings'); /******************************************* * plugin text domain for translations *******************************************/ load_plugin_textdomain( 'pippin_stripe', false, dirname( plugin_basename( __FILE__ ) ) . '/languages/' ); /********************************** * includes **********************************/ if(is_admin()) { // load admin includes include(STRIPE_BASE_DIR . '/includes/settings.php'); } else { // load front-end includes include(STRIPE_BASE_DIR . '/includes/scripts.php'); include(STRIPE_BASE_DIR . '/includes/shortcodes.php'); include(STRIPE_BASE_DIR . '/includes/process-payment.php'); } |
The Settings Page
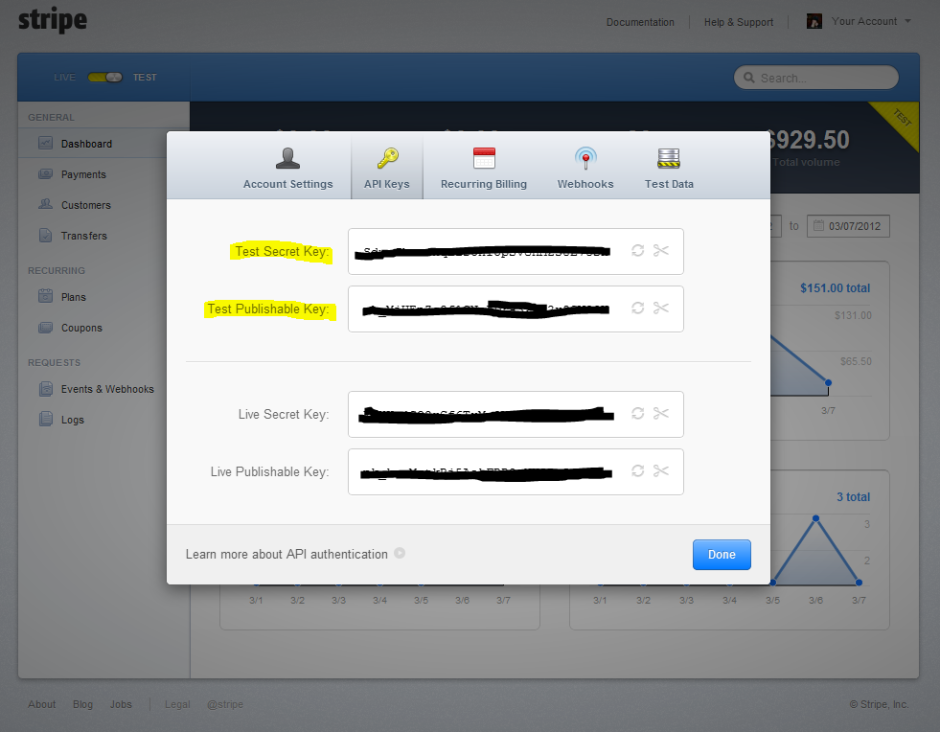
In order for our Stripe integration to function, we must have a place to enter our Stripe API keys, which can be obtained from the Your Account page when logged into your Stripe account.
There are four API keys:
- Live Secret
- Live Publishable
- Test Secret
- Test Publishable
The third and fourth keys are for when using Stripe in test mode. Since Stripe provides a phenomenal testing environment, we are going to provide the options to utilize it.
Our options page code looks like this:
1 2 3 4 5 6 7 8 9 10 11 12 13 14 15 16 17 18 19 20 21 22 23 24 25 26 27 28 29 30 31 32 33 34 35 36 37 38 39 40 41 42 43 44 45 46 47 48 49 50 51 52 53 54 55 56 57 58 59 60 61 62 63 64 65 66 67 68 69 70 71 72 73 74 75 76 77 78 79 80 81 82 83 84 85 | <?php function pippin_stripe_settings_setup() { add_options_page('Stripe Settings', 'Stripe Settings', 'manage_options', 'stripe-settings', 'pippin_stripe_render_options_page'); } add_action('admin_menu', 'pippin_stripe_settings_setup'); function pippin_stripe_render_options_page() { global $stripe_options; ?> <div class="wrap"> <h2><?php _e('Stripe Settings', 'pippin_stripe'); ?></h2> <form method="post" action="options.php"> <?php settings_fields('stripe_settings_group'); ?> <table class="form-table"> <tbody> <tr valign="top"> <th scope="row" valign="top"> <?php _e('Test Mode', 'pippin_stripe'); ?> </th> <td> <input id="stripe_settings[test_mode]" name="stripe_settings[test_mode]" type="checkbox" value="1" <?php checked(1, $stripe_options['test_mode']); ?> /> <label class="description" for="stripe_settings[test_mode]"><?php _e('Check this to use the plugin in test mode.', 'pippin_stripe'); ?></label> </td> </tr> </tbody> </table> <h3 class="title"><?php _e('API Keys', 'pippin_stripe'); ?></h3> <table class="form-table"> <tbody> <tr valign="top"> <th scope="row" valign="top"> <?php _e('Live Secret', 'pippin_stripe'); ?> </th> <td> <input id="stripe_settings[live_secret_key]" name="stripe_settings[live_secret_key]" type="text" class="regular-text" value="<?php echo $stripe_options['live_secret_key']; ?>"/> <label class="description" for="stripe_settings[live_secret_key]"><?php _e('Paste your live secret key.', 'pippin_stripe'); ?></label> </td> </tr> <tr valign="top"> <th scope="row" valign="top"> <?php _e('Live Publishable', 'pippin_stripe'); ?> </th> <td> <input id="stripe_settings[live_publishable_key]" name="stripe_settings[live_publishable_key]" type="text" class="regular-text" value="<?php echo $stripe_options['live_publishable_key']; ?>"/> <label class="description" for="stripe_settings[live_publishable_key]"><?php _e('Paste your live publishable key.', 'pippin_stripe'); ?></label> </td> </tr> <tr valign="top"> <th scope="row" valign="top"> <?php _e('Test Secret', 'pippin_stripe'); ?> </th> <td> <input id="stripe_settings[test_secret_key]" name="stripe_settings[test_secret_key]" type="text" class="regular-text" value="<?php echo $stripe_options['test_secret_key']; ?>"/> <label class="description" for="stripe_settings[test_secret_key]"><?php _e('Paste your test secret key.', 'pippin_stripe'); ?></label> </td> </tr> <tr valign="top"> <th scope="row" valign="top"> <?php _e('Test Publishable', 'pippin_stripe'); ?> </th> <td> <input id="stripe_settings[test_publishable_key]" name="stripe_settings[test_publishable_key]" class="regular-text" type="text" value="<?php echo $stripe_options['test_publishable_key']; ?>"/> <label class="description" for="stripe_settings[test_publishable_key]"><?php _e('Paste your test publishable key.', 'pippin_stripe'); ?></label> </td> </tr> </tbody> </table> <p class="submit"> <input type="submit" class="button-primary" value="<?php _e('Save Options', 'mfwp_domain'); ?>" /> </p> </form> <?php } function pippin_stripe_register_settings() { // creates our settings in the options table register_setting('stripe_settings_group', 'stripe_settings'); } add_action('admin_init', 'pippin_stripe_register_settings'); |
All of the code for our settings page is saved in the settings.php file.
The Payment Form Short Code
As shown in the screenshot at the top, we are going to build a simple payment form that allows the user to enter their credit card details and make a payment of $10. In a real-world integration, we would build more robust price and currency options, but for this tutorial a set amount of 10 dollars USD works well.
The payment form is outputted with the [payment_form] short code. The PHP for this short code is placed in the shortcodes.php file and looks like this:
1 2 3 4 5 6 7 8 9 10 11 12 13 14 15 16 17 18 19 20 21 22 23 24 25 26 27 28 29 30 31 | <?php function pippin_stripe_payment_form() { if(isset($_GET['payment']) && $_GET['payment'] == 'paid') { echo '<p class="success">' . __('Thank you for your payment.', 'pippin_stripe') . '</p>'; } else { ?> <h2><?php _e('Submit a payment of $10', 'pippin_stripe'); ?></h2> <form action="" method="POST" id="stripe-payment-form"> <div class="form-row"> <label><?php _e('Card Number', 'pippin_stripe'); ?></label> <input type="text" size="20" autocomplete="off" class="card-number"/> </div> <div class="form-row"> <label><?php _e('CVC', 'pippin_stripe'); ?></label> <input type="text" size="4" autocomplete="off" class="card-cvc"/> </div> <div class="form-row"> <label><?php _e('Expiration (MM/YYYY)', 'pippin_stripe'); ?></label> <input type="text" size="2" class="card-expiry-month"/> <span> / </span> <input type="text" size="4" class="card-expiry-year"/> </div> <input type="hidden" name="action" value="stripe"/> <input type="hidden" name="redirect" value="<?php echo get_permalink(); ?>"/> <input type="hidden" name="stripe_nonce" value="<?php echo wp_create_nonce('stripe-nonce'); ?>"/> <button type="submit" id="stripe-submit"><?php _e('Submit Payment', 'pippin_stripe'); ?></button> </form> <div class="payment-errors"></div> <?php } } add_shortcode('payment_form', 'pippin_stripe_payment_form'); |
This form has one conditional statement in it that checks to see if the payment $_GET variable is set, and if it equals paid. If it does, then the confirmation message is shown instead of the payment form.
One very important thing to note about this payment form is that none of the credit card information input fields have name attributes. This is for security reasons. When an input field does not have a name attribute, it is not sent to the server when submitting the form. This helps to ensure that credit cards processed through are form are not compromised by malicious hackers or code.
Loading the Stripe JS Scripts
The simplest method of integrating Stripe uses jQuery for processing credit card details, instead of posting them to the server and processing them with PHP. The javascript method of processing credit cards is not required, but it’s simpler (and more easily secured) than sending the card details through the server, so we’re going to use the javascript method for this tutorial.
For our payment form to be processed, we need to load jQuery, the stripe.js file (which is provided by Stripe), and a custom jQuery file (that we will write in a moment) that is used to send the payment details to Stripe. We also need to place our publishable API key (either test or live, depending on our mode selected in settings) into a global variable so that our stripe-processing.js file can read it.
This function goes into scripts.php:
1 2 3 4 5 6 7 8 9 10 11 12 13 14 15 16 17 18 19 20 21 22 | <?php function pippin_load_stripe_scripts() { global $stripe_options; // check to see if we are in test mode if(isset($stripe_options['test_mode']) && $stripe_options['test_mode']) { $publishable = $stripe_options['test_publishable_key']; } else { $publishable = $stripe_options['live_publishable_key']; } wp_enqueue_script('jquery'); wp_enqueue_script('stripe', 'https://js.stripe.com/v1/'); wp_enqueue_script('stripe-processing', STRIPE_BASE_URL . 'includes/js/stripe-processing.js'); wp_localize_script('stripe-processing', 'stripe_vars', array( 'publishable_key' => $publishable, ) ); } add_action('wp_enqueue_scripts', 'pippin_load_stripe_scripts'); |
JS Processing of the Payment Form
When a user fills out the payment form and clicks submit, the card details they entered are sent to Stripe for validation. If there is an error, the error is displayed in the div.payment-errors element. If there are no errors, then a “token” is created. This token contains all of the information necessary for charging a user’s credit card via PHP and is submitted to the server.
Our stripe-processing.js file looks like this:
1 2 3 4 5 6 7 8 9 10 11 12 13 14 15 16 17 18 19 20 21 22 23 24 25 26 27 28 29 30 31 32 33 34 | Stripe.setPublishableKey(stripe_vars.publishable_key); function stripeResponseHandler(status, response) { if (response.error) { // show errors returned by Stripe jQuery(".payment-errors").html(response.error.message); // re-enable the submit button jQuery('#stripe-submit').attr("disabled", false); } else { var form$ = jQuery("#stripe-payment-form"); // token contains id, last4, and card type var token = response['id']; // insert the token into the form so it gets submitted to the server form$.append("<input type='hidden' name='stripeToken' value='" + token + "'/>"); // and submit form$.get(0).submit(); } } jQuery(document).ready(function($) { $("#stripe-payment-form").submit(function(event) { // disable the submit button to prevent repeated clicks $('#stripe-submit').attr("disabled", "disabled"); // send the card details to Stripe Stripe.createToken({ number: $('.card-number').val(), cvc: $('.card-cvc').val(), exp_month: $('.card-expiry-month').val(), exp_year: $('.card-expiry-year').val() }, stripeResponseHandler); // prevent the form from submitting with the default action return false; }); }); |
Note that the payment form is only actually submitted once Stripe has verified that the credit card details are valid. When the form is submitted, the posted data will look like this (for interpretation by PHP):
- action=stripe
- redirect={url of current page}
- stripe_nonce={unique nonce key for extra verification}
- stripeToken={unique token returned from the Stripe API for our customer’s card}
All of this information is now ready to be processed via PHP. This is the point that the customer’s card is actually charged.
Processing the Payment with PHP
The stripe.js file created a “token” for us, which is basically a unique key generated by Stripe that contains all of the necessary information about the credit card to process a transaction. All we need to do in order to charge the customer’s card is setup a function that listens for the stripe action and then fires a Stripe API call when the action is called.
This function goes inside of process-payment.php:
1 2 3 4 5 6 7 8 9 10 11 12 13 14 15 16 17 18 19 20 21 22 23 24 25 26 27 28 29 30 31 32 33 34 35 36 37 38 39 40 41 42 | function pippin_stripe_process_payment() { if(isset($_POST['action']) && $_POST['action'] == 'stripe' && wp_verify_nonce($_POST['stripe_nonce'], 'stripe-nonce')) { global $stripe_options; // load the stripe libraries require_once(STRIPE_BASE_DIR . '/lib/Stripe.php'); // retrieve the token generated by stripe.js $token = $_POST['stripeToken']; // check if we are using test mode if(isset($stripe_options['test_mode']) && $stripe_options['test_mode']) { $secret_key = $stripe_options['test_secret_key']; } else { $secret_key = $stripe_options['live_secret_key']; } // attempt to charge the customer's card try { Stripe::setApiKey($secret_key); $charge = Stripe_Charge::create(array( 'amount' => 1000, // $10 'currency' => 'usd', 'card' => $token ) ); // redirect on successful payment $redirect = add_query_arg('payment', 'paid', $_POST['redirect']); } catch (Exception $e) { // redirect on failed payment $redirect = add_query_arg('payment', 'failed', $_POST['redirect']); } // redirect back to our previous page with the added query variable wp_redirect($redirect); exit; } } add_action('init', 'pippin_stripe_process_payment'); |
There really is not much going on inside of this function that is overly complex.
At the very top we first check to make sure that the function is only run when the $_POST[‘action’] variable is set, and that it equals stripe. We also confirm that our nonce verifies. This is to help improve security, which is very, very important when processing credit cards, even though we are not actually processing the card numbers themselves.
Once we have verified that we are supposed to be processing a transaction, we load up the global $stripe_options variable, and also load the Stripe libraries that we downloaded at the very beginning of this tutorial.
After we have loaded the Stripe libraries, we set the $token variable equal to the $_POST[‘stripeToken’] variable. This is just to make things a little easier to follow.
Next we perform a simple check to see whether the plugin is being used in test mode.
As soon as we have setup the $secret_key variable, we attempt to create a charge using the the Stripe_Charge::create() function. If the charge succeeds, then we set the $redirect variable equal to the permalink of the page we posted the form from with an added “payment=paid” query argument.
If our charge fails, then an exception is caught and the $redirect variable is set equal to the permalink of the previous page with an added query argument of “payment=failed”.
At the very bottom we simply redirect back to the page with the payment form. If the payment was successful, the user will see the confirmation message. If it failed, they will see the form again. This could obviously be improved to show an error message.
And that’s it! Our simple Stripe payment form is now complete and we can begin accepting payments.
Testing the Payment Form
Obviously once you have built something like this, you want a way to test that it fully works without creating actual charges that cost you (or someone else) real money. Thankfully, Stripe has a magnificent testing system that allows you to perform just about any kind of test you want.
To test your payment form, follow these steps:
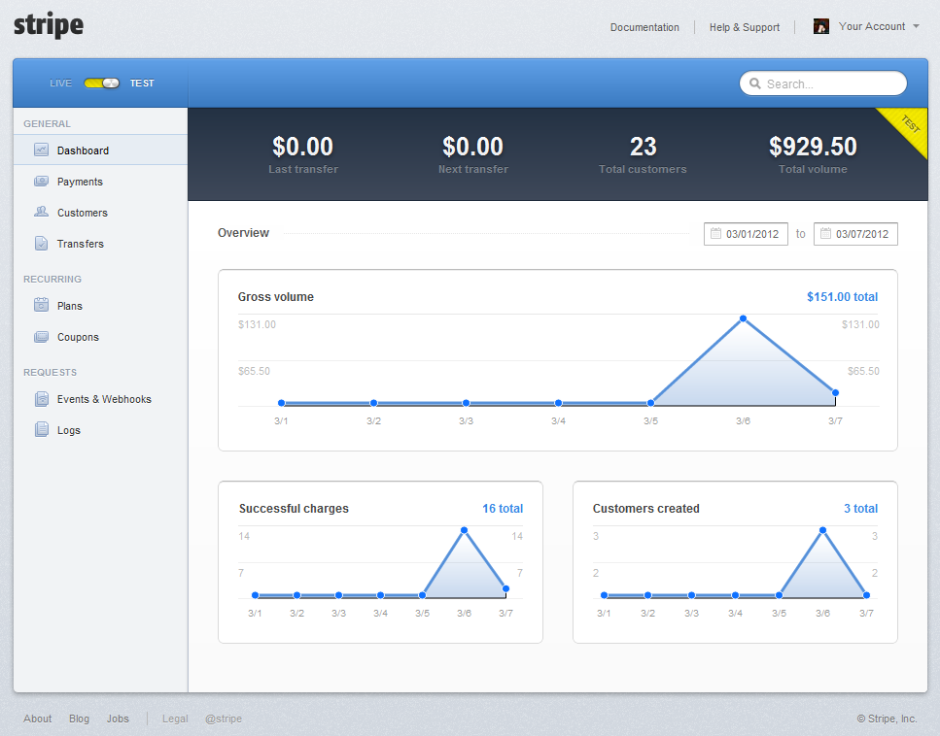
1. Put Stripe into test mode using “Test Mode” toggle switch in the top left:
2. Get your test API keys and enter them in your WordPress Stripe Settings options page. Make sure that you check the box for “Test Mode”.
3. Enter the following credit card details in the payment form:
- Card number: 4242424242424242
- CVC: 222 (can be any 3-digit number)
- Expiration: 12 / 2015 (can be any date in the future)
4. Hit Submit payment
5 Go to your Stripe account and click Payments. You should now be presented with a list of all recent payments, and it will look something like this:
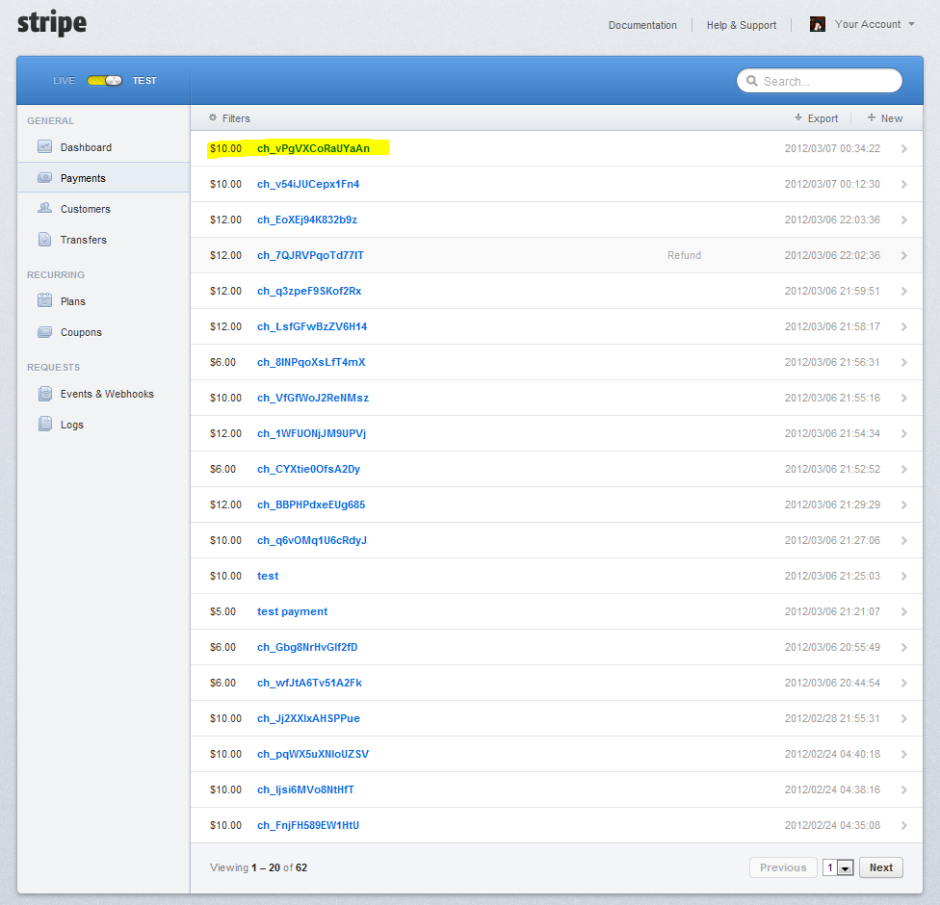
That’s it! As long as the payment you just made is included in the list, everything worked perfectly. This means that you can safely take the plugin out of Test Mode and begin accepting real payments.
Download the Complete Plugin for Part 1
The complete plugin that has been written in this tutorial can be downloaded below.
[download id=”35″ format=1]
I hope you have enjoyed this tutorial.


Great tutorial and plugin!
One question: I’m not a great programmer (but learning) and I was wondering if there was a way of controlling the amount of the purchase and the amount in the purchase header (“Submit a payment of $XX”) within the shortcode.
Having a shortcode like : [payment_form $=20].
Just curious. That would add great flexibility.
Thanks!
Yes, there is definitely a way to do that, and I’m going to cover that in part 3 🙂
For some reason the plug-in isn’t working in test mode. I have test-mode checked in the plug-in, test mode in my stripe account, and provided ONLY the test keys.
However when I click submit I get the message “Your card was declined”. I’m using WordPress 3.4. What’s going on? Does the site have to actually be online, and not on a local machine to work?
Are you using the source code from this part of the series? If so, I’d suggest going to the last part of the series and using that version of the plugin. The code changes a lot through the series.
Hi, Nice work 🙂 I want to know if its US currency only? I live in the UK
It’s US only at the moment. It’s about to be available in Canada and then other countries after that.
It’s avaliable in UK now with GBP 😉
There’s a site out there that creates stripe payment forms for you. http://www.easybill.co I am just starting to learn to program, and this fit the spot for me.
I haven’t read through the other tutorials, but I want to do a subscription model and if they don’t pay it cancels the account. Is it possible to set this up? i am REALLY! newb to coding and am only good at following tutorials lol
Yes it is! You will need to look into the Webhook / event system. The part on payment receipts will be a good place to start.
Hi Pippin,
I downloaded the source code and trying to install the plugin in my wordpress page but it is not working.
For example, I don’t see where the user would enter the amount, even though this is possible after part 3. When I submit the form without the amount I get an error message saying that the payment amount needs to be at least 50 cents.
Not sure if I am starting with the right short code?
[payment_form]
The amount is specified one line 23 of pippin_stripe_process_payment() and is in cents, so 1000 = $10.
Hi,
I’ve installed the plugin from step 9 and have activated my stripe account, entered in the 4 test and live keys into the stripe dashboard. I have it set in test mode in the plugin but it’s live on stripe since we have been making charges directly to the stripe account. I’ve created a website page and put in the shortcode as listed above. When I fill in the payment fields and click ‘submit payment’ I get the following error message:
Fatal error: Class ‘Stripe_Customer’ not found in /…/wp-content/plugins/wordpress-stripe-integration/includes/process-payment.php on line 142
I’ve checked the plugin folders and all of the files are in their correct position (I think:)
What am I missing? Thanks!
Have you only downloaded the parts from Part 9, or did you download previous parts and combine them?
Hi Pippin,
I think I may have combined different tutorial downloads as you said so I deactivated and deleted the plugin then reinstalled the part 9 version. I don’t get the “Stripe_Customer not found” error anymore but now I am getting this error after I hit the ‘submit payment’ button:
“exception ‘Stripe_CardError’ with message ‘Cannot charge a customer that has no active card’ in /…/wp-content/plugins/wordpress-stripe-integration/lib/Stripe/ApiRequestor.php:72 ”
I looked at the ‘catching errors’ section of the stripe api which lists this error but could not figure out what the problem is.
Thanks again for your help.
Did you enter a credit card number during purchase?
Error While submitting
exception ‘Stripe_InvalidRequestError’ with message ‘Amount must be at least 50c’ in C:\wamp\www\new-gazi\wp-content\plugins\wordpress-stripe-integration\lib\Stripe\ApiRequestor.php:66 Stack trace: #0 C:\wamp\www\new-gazi\wp-content\plugins\wordpress-stripe-integration\lib\Stripe\ApiRequestor.php(114): Stripe_ApiRequestor->handleApiError(‘{? “error”: {?…’, 400, Array) #1 C:\wamp\www\new-gazi\wp-content\plugins\wordpress-stripe-integration\lib\Stripe\ApiRequestor.php(54): Stripe_ApiRequestor->_interpretResponse(‘{? “error”: {?…’, 400) #2 C:\wamp\www\new-gazi\wp-content\plugins\wordpress-stripe-integration\lib\Stripe\ApiResource.php(69): Stripe_ApiRequestor->request(‘post’, ‘/charges’, Array) #3 C:\wamp\www\new-gazi\wp-content\plugins\wordpress-stripe-integration\lib\Stripe\Charge.php(26): Stripe_ApiResource::_scopedCreate(‘Stripe_Charge’, Array, NULL) #4 C:\wamp\www\new-gazi\wp-content\plugins\wordpress-stripe-integration\includes\process-payment.php(161): Stripe_Charge::create(Array) #5 [internal function]: pippin_stripe_process_payment(”) #6 C:\wamp\www\new-gazi\wp-includes\plugin.php(406): call_user_func_array(‘pippin_stripe_p…’, Array) #7 C:\wamp\www\new-gazi\wp-settings.php(306): do_action(‘init’) #8 C:\wamp\www\new-gazi\wp-config.php(90): require_once(‘C:\wamp\www\new…’) #9 C:\wamp\www\new-gazi\wp-load.php(29): require_once(‘C:\wamp\www\new…’) #10 C:\wamp\www\new-gazi\wp-blog-header.php(12): require_once(‘C:\wamp\www\new…’) #11 C:\wamp\www\new-gazi\index.php(17): require(‘C:\wamp\www\new…’) #12 {main}
You have to set the amount to more than 50 cents.
Great post. I’ve got a newb question about processing forms in WordPress. You set up pippin_stripe_process_payment() in a loop to listen for the right POST variable and then execute (i.e. wait for POST[‘action’] == ‘stripe’). Why are you processing the form this way instead of defining the action in the form to something like process_stripe.php and then just have the form submit to that file? It seems like this must be a WordPress thing but I was just wondering what the logic was behind this.
Thanks again for the great article.
If you were to process it via a .php file, instead of listening for the POST, you wouldn’t have access to the core WordPress functions.
Hi,
I’ve used your plugin and it all works fine, but for some reason when I use the shortcode the form appears at the top of the page, not where I’ve placed the shortcode in the editor.
Any idea why this is going on?
Thanks!
Make sure you ‘return’ the HTML, not ‘echo’ it.
That’s what I tried, but it didn’t seem to make a difference.
Just realized what it was:
I was missing a semi-colon at the end of
return ob_get_clean();Should have been more careful, sorry about the trouble.
One other question: I’ve got a two forms on one page, because I have two different things I want to process payments for. However, since I’m returning p.success / p.error after payments, every time any of the three form succeeds/fails to make a charge, I get the paragraph returned. Any thoughts on getting around this?
Thanks again,
JC
You will have to modify the forms to each add more unique success/fail variables to the URL so that you can detect which is which.
The plugin link is down, could i get a new link or the download? Great post by the way!
Try it now.
I followed the tutorial and kept getting a payment failure, and then installed the plugin as-is and still got the payment failure. How can I figure out what the problem is?
What is the payment error?
I get the “&payment=failed” URL after I submit the payment. I tried it both on the test server on my computer and live on my site.
Stripe should have errors in their log. What do they say?
What’s confusing is that when I try my version copied from your tutorial, I get the following error:
error:
type: “invalid_request_error”
message: “You must supply either a card or a customer id”
…but when I try the version I downloaded directly from your link, I don’t get an error in Stripe’s logs, but I also don’t get a charge or any other indication that anything happened, and I still get the “&payment=failed” URL.
I also tried the plugin from part 9, and Stripe gave me this error:
message: “Cannot charge a customer that has no active card”
type: “card_error”
param: “card”
code: “missing”
It looks like a card error is the underlying cause, but I’m not sure why Stripe treats the downloaded and copied versions of part 1 differently, but they both fail. Any ideas?
Receiving this error….
Fatal error: Cannot redeclare class Stripe in /data/19/3/37/25/3037514/user/3374449/htdocs/ph/wp-content/plugins/wordpress-stripe-integration/lib/Stripe.php on line 15
Any insight as to where this is coming from?
Deactivated all plugins except wordpress-stripe-integration and it worked. Have to find out who the culprit is using the class.
Sorry you can delete my post… thanks
getting this error in v2.0.1
Class ‘Stripe_Charge’ not found in
Make sure you have included the Stripe API libraries.
where is Class Stripe_Charge
It’s inside of the Stripe API library.
Pippin, had to change payment processors from Paypal to Stripe. The
Stripe payment companion box does not appear at the top of the HTML editor, but I have successfully added a pay button that accepts
payment by entering the shortcode on that page. I now want to add
a redirect url after a successful purchase. Would you please explain
how to do this. Also, could I make this url the actual download page
that resides in dropbox, instead of a page with the link to that download.
thank you
Paul Miller
Hi Paul,
Did you add the payment form by following this tutorial series or through your own custom code, another plugin, or some other method?
Paul I don’t know if you’re still having issues but in February 2015 the Stripe library switched to using namespaces instead of Stripe_Class names .. so many of the classes used in this tutorial have been changed. Good luck!
Hi Erica,
I’ve been following this tutorial, but I want to use namespaces instead, as I am using the latest library. Do you have any pointers that could help me do this? I am quite new to php – so far I tried just using “use \Stripe;” instead of using the “require” statements, but that didn’t work.
I know that most of the stripe functionality is under the Stripe namespace, but I am not sure how to use that namespace properly.
Thanks!
Harry
Hi,
I have an issue about total amount when charge from client.
I want the total amount is included the stripe fee (1.75% and 30 cents)
e.g : when client donate $10 but the total amount they have to donate is $10 + stripe fee
how can i do it ?
Many thanks!
Hi,
Just wanted to thank you for the quality of this tutorial and for making it available for all.
Hey ! thanks for this plugin. But there is an issue as its generating some kind of malware ( cross-site scripting attack). So, how could i remove this type of vulnerability ?
Do you use Kapersky? They are known to block Stripe.
Payment form not getting displayed using the do_shortcode(‘[payment_form]’);
Is there any other way ?
Any help is appreciated 🙂
Add `echo` to the front of it.
Hello,
This is the second time I am commenting here, I don’t know but today i cannot see my previous comment here above. I tried to contact through contact page.
I really liked your plugin and stucked up in between.
Please do the needful. Thank you 🙂
Has this plugin been updated to take into account the namespacing issue?
It has not, though it’s pretty easy to adjust the API calls for the new SDKs that include namespacing.
Hii,
I installed your plugin on my wordpress instance and everything seems to work except the last step.
I have linked payment-process.php in action of shortcode.php
when the stripe token api returns successfully from the jQuery code then form get submitted on payment-process.php throwing the following error
Undefined method add_action ……….
I thought it might be due to wordpress is not initialized on that script so i added require(‘{WORDPRESS_ROOT}/wp-load.php’);
but then it started with this error:
Fatal error: Cannot redeclare pippin_stripe_process_payment() (previously declared in /home/asquare/public_html/aajtak/wp-content/plugins/wordpress-stripe-integration/includes/process-payment.php:4) in /home/asquare/public_html/aajtak/wp-content/plugins/wordpress-stripe-integration/includes/process-payment.php on line 43
Only I can say excellent tutorial. I will go through all the section. I want to integrate stripe subscription in my site.
got a question here on the publishable API key. The requests to stripe is going directly from the customer’s computer. So how is my (merchant’s) API key made available on the customer computer for it to be sent along with card details?
Hello Team,
I am getting the error while using this code and not getting the stripe.js. Please let me know is the stripe-processing.js file is same as the stripe.js or i need anything else for the same and currently i am getting the /?payment=failed in url
Hi,
Just wanted to let you know the download link is broken. Can you fix it? It displays as [download id=”35″ format=1].
I’m getting the same issue. Please help