This entry is part 1 of 9 in the Integrating Stripe.com with WordPress Series
- Stripe Integration Part 1 – Building the Settings and a Simple Payment Form
- Stripe Integration Part 2 – Recurring Payments
- Stripe Integration Part 3 – Variable Prices and Enhanced Plan Handling
- Stripe Integration Part 4 – Multiple Recurring Payment Options
- Stripe Integration Part 5 – Accepting Discount Codes
- Stripe Integration Part 6 – Payment Receipts
- Stripe Integration Part 7 – Creating and Storing Customers
- Stripe Integration Part 8 – Working with Invoices
- Stripe Integration Part 9 – The Stripe Button
Stripe.com offers a very powerful system for accepting payments, including subscriptions. One of the particularly great things about Stripe is how easy its API is to use and integrate into your own projects. This tutorial series is going to walk you through many of the necessary steps for integrating Stripe, and many of its quality features, into WordPress. In this first part, we will look at setting up are basic plugin structure and building a very simple payment form. The payment form will allow users to submit a payment of a pre-defined amount to your Stripe.com account.
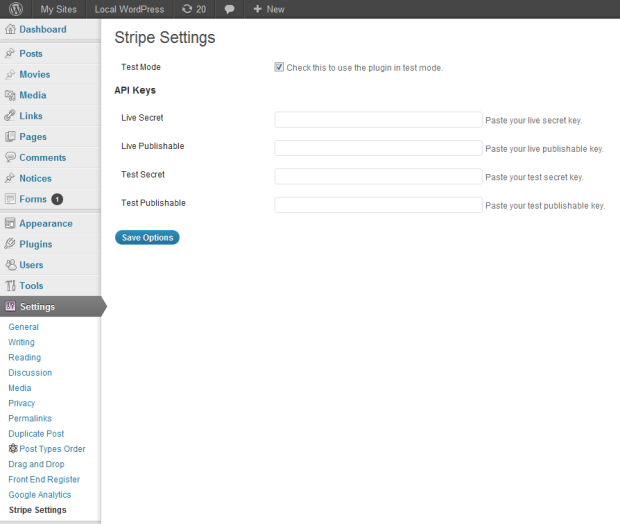
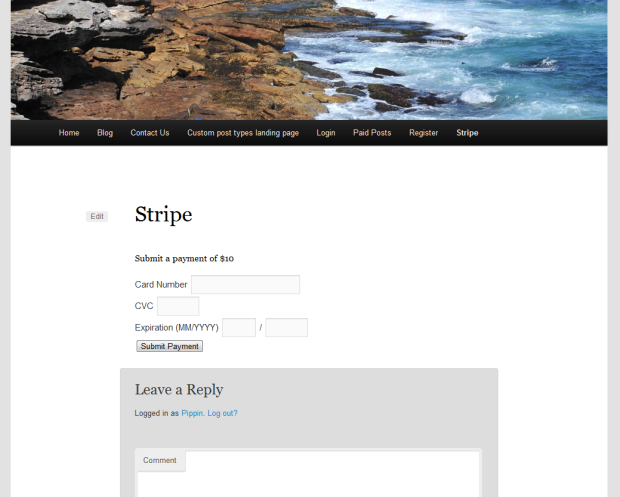
Throughout this series, we will create a complete (though perhaps disjointed) plugin that will be able to perform most of the functions Stripe offers. For this first part, we’re going to build the basic plugin structure and a simple payment form. Once we are done, we will have a settings page and a short code to display the payment form, both of which are illustrated in the screenshots below:
Getting Started
As always, a good way to start a plugin is to build the folder structure. For this Stripe integration plugin, our folder structure looks like this:
- wordpress-stripe-integration
- includes
- languages
- wordpress-stripe-integration.php
Once we have our basic plugin structure, we need to go and download the Stripe PHP API libraries. You can do that from the Stripe libraries page. Once you have downloaded them, extract the file and place the lib folder into our root plugin directory. Our plugin folder should now be:
- wordpress-stripe-integration
- includes
- languages
- lib
- wordpress-stripe-integration.php
The next couple steps in this tutorial will be focusing on getting the non-Stripe aspects out of the way. This includes our main plugin file, our short code, and our settings page. Once all of those are setup, we will integrate the Stripe portion.
Building the Main Plugin File
Since this tutorial series is focusing on how to use the Stripe API, I’m not going to walk you through exactly how to build every element of our plugin, not when they are standard elements that are included in nearly every other plugin. I want to, instead, explain in detail how the aspects that deal directly with Stripe work, but show you the regular WordPress elements as well so that you can gain a really good grasp of how this integration works.
The complete code for our root plugin file is below:
1 2 3 4 5 6 7 8 9 10 11 12 13 14 15 16 17 18 19 20 21 22 23 24 25 26 27 28 29 30 31 32 33 34 35 36 37 38 39 40 41 42 43 | <?php /* Plugin Name: WordPress Stripe Integration Plugin URI: https://pippinsplugins.com/ Description: A plugin to illustrate how to integrate Stripe and WordPress Author: Pippin Williamson Author URI: https://pippinsplugins.com COntributors: mordauk Version: 1.0 */ /********************************** * constants and globals **********************************/ if(!defined('STRIPE_BASE_URL')) { define('STRIPE_BASE_URL', plugin_dir_url(__FILE__)); } if(!defined('STRIPE_BASE_DIR')) { define('STRIPE_BASE_DIR', dirname(__FILE__)); } $stripe_options = get_option('stripe_settings'); /******************************************* * plugin text domain for translations *******************************************/ load_plugin_textdomain( 'pippin_stripe', false, dirname( plugin_basename( __FILE__ ) ) . '/languages/' ); /********************************** * includes **********************************/ if(is_admin()) { // load admin includes include(STRIPE_BASE_DIR . '/includes/settings.php'); } else { // load front-end includes include(STRIPE_BASE_DIR . '/includes/scripts.php'); include(STRIPE_BASE_DIR . '/includes/shortcodes.php'); include(STRIPE_BASE_DIR . '/includes/process-payment.php'); } |
The Settings Page
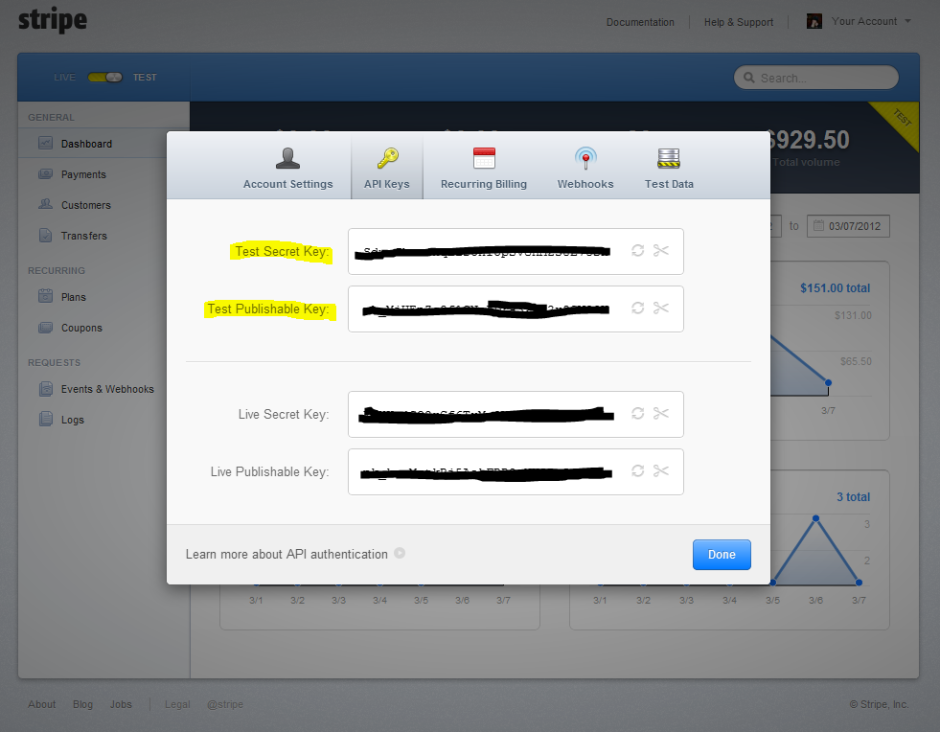
In order for our Stripe integration to function, we must have a place to enter our Stripe API keys, which can be obtained from the Your Account page when logged into your Stripe account.
There are four API keys:
- Live Secret
- Live Publishable
- Test Secret
- Test Publishable
The third and fourth keys are for when using Stripe in test mode. Since Stripe provides a phenomenal testing environment, we are going to provide the options to utilize it.
Our options page code looks like this:
1 2 3 4 5 6 7 8 9 10 11 12 13 14 15 16 17 18 19 20 21 22 23 24 25 26 27 28 29 30 31 32 33 34 35 36 37 38 39 40 41 42 43 44 45 46 47 48 49 50 51 52 53 54 55 56 57 58 59 60 61 62 63 64 65 66 67 68 69 70 71 72 73 74 75 76 77 78 79 80 81 82 83 84 85 | <?php function pippin_stripe_settings_setup() { add_options_page('Stripe Settings', 'Stripe Settings', 'manage_options', 'stripe-settings', 'pippin_stripe_render_options_page'); } add_action('admin_menu', 'pippin_stripe_settings_setup'); function pippin_stripe_render_options_page() { global $stripe_options; ?> <div class="wrap"> <h2><?php _e('Stripe Settings', 'pippin_stripe'); ?></h2> <form method="post" action="options.php"> <?php settings_fields('stripe_settings_group'); ?> <table class="form-table"> <tbody> <tr valign="top"> <th scope="row" valign="top"> <?php _e('Test Mode', 'pippin_stripe'); ?> </th> <td> <input id="stripe_settings[test_mode]" name="stripe_settings[test_mode]" type="checkbox" value="1" <?php checked(1, $stripe_options['test_mode']); ?> /> <label class="description" for="stripe_settings[test_mode]"><?php _e('Check this to use the plugin in test mode.', 'pippin_stripe'); ?></label> </td> </tr> </tbody> </table> <h3 class="title"><?php _e('API Keys', 'pippin_stripe'); ?></h3> <table class="form-table"> <tbody> <tr valign="top"> <th scope="row" valign="top"> <?php _e('Live Secret', 'pippin_stripe'); ?> </th> <td> <input id="stripe_settings[live_secret_key]" name="stripe_settings[live_secret_key]" type="text" class="regular-text" value="<?php echo $stripe_options['live_secret_key']; ?>"/> <label class="description" for="stripe_settings[live_secret_key]"><?php _e('Paste your live secret key.', 'pippin_stripe'); ?></label> </td> </tr> <tr valign="top"> <th scope="row" valign="top"> <?php _e('Live Publishable', 'pippin_stripe'); ?> </th> <td> <input id="stripe_settings[live_publishable_key]" name="stripe_settings[live_publishable_key]" type="text" class="regular-text" value="<?php echo $stripe_options['live_publishable_key']; ?>"/> <label class="description" for="stripe_settings[live_publishable_key]"><?php _e('Paste your live publishable key.', 'pippin_stripe'); ?></label> </td> </tr> <tr valign="top"> <th scope="row" valign="top"> <?php _e('Test Secret', 'pippin_stripe'); ?> </th> <td> <input id="stripe_settings[test_secret_key]" name="stripe_settings[test_secret_key]" type="text" class="regular-text" value="<?php echo $stripe_options['test_secret_key']; ?>"/> <label class="description" for="stripe_settings[test_secret_key]"><?php _e('Paste your test secret key.', 'pippin_stripe'); ?></label> </td> </tr> <tr valign="top"> <th scope="row" valign="top"> <?php _e('Test Publishable', 'pippin_stripe'); ?> </th> <td> <input id="stripe_settings[test_publishable_key]" name="stripe_settings[test_publishable_key]" class="regular-text" type="text" value="<?php echo $stripe_options['test_publishable_key']; ?>"/> <label class="description" for="stripe_settings[test_publishable_key]"><?php _e('Paste your test publishable key.', 'pippin_stripe'); ?></label> </td> </tr> </tbody> </table> <p class="submit"> <input type="submit" class="button-primary" value="<?php _e('Save Options', 'mfwp_domain'); ?>" /> </p> </form> <?php } function pippin_stripe_register_settings() { // creates our settings in the options table register_setting('stripe_settings_group', 'stripe_settings'); } add_action('admin_init', 'pippin_stripe_register_settings'); |
All of the code for our settings page is saved in the settings.php file.
The Payment Form Short Code
As shown in the screenshot at the top, we are going to build a simple payment form that allows the user to enter their credit card details and make a payment of $10. In a real-world integration, we would build more robust price and currency options, but for this tutorial a set amount of 10 dollars USD works well.
The payment form is outputted with the [payment_form] short code. The PHP for this short code is placed in the shortcodes.php file and looks like this:
1 2 3 4 5 6 7 8 9 10 11 12 13 14 15 16 17 18 19 20 21 22 23 24 25 26 27 28 29 30 31 | <?php function pippin_stripe_payment_form() { if(isset($_GET['payment']) && $_GET['payment'] == 'paid') { echo '<p class="success">' . __('Thank you for your payment.', 'pippin_stripe') . '</p>'; } else { ?> <h2><?php _e('Submit a payment of $10', 'pippin_stripe'); ?></h2> <form action="" method="POST" id="stripe-payment-form"> <div class="form-row"> <label><?php _e('Card Number', 'pippin_stripe'); ?></label> <input type="text" size="20" autocomplete="off" class="card-number"/> </div> <div class="form-row"> <label><?php _e('CVC', 'pippin_stripe'); ?></label> <input type="text" size="4" autocomplete="off" class="card-cvc"/> </div> <div class="form-row"> <label><?php _e('Expiration (MM/YYYY)', 'pippin_stripe'); ?></label> <input type="text" size="2" class="card-expiry-month"/> <span> / </span> <input type="text" size="4" class="card-expiry-year"/> </div> <input type="hidden" name="action" value="stripe"/> <input type="hidden" name="redirect" value="<?php echo get_permalink(); ?>"/> <input type="hidden" name="stripe_nonce" value="<?php echo wp_create_nonce('stripe-nonce'); ?>"/> <button type="submit" id="stripe-submit"><?php _e('Submit Payment', 'pippin_stripe'); ?></button> </form> <div class="payment-errors"></div> <?php } } add_shortcode('payment_form', 'pippin_stripe_payment_form'); |
This form has one conditional statement in it that checks to see if the payment $_GET variable is set, and if it equals paid. If it does, then the confirmation message is shown instead of the payment form.
One very important thing to note about this payment form is that none of the credit card information input fields have name attributes. This is for security reasons. When an input field does not have a name attribute, it is not sent to the server when submitting the form. This helps to ensure that credit cards processed through are form are not compromised by malicious hackers or code.
Loading the Stripe JS Scripts
The simplest method of integrating Stripe uses jQuery for processing credit card details, instead of posting them to the server and processing them with PHP. The javascript method of processing credit cards is not required, but it’s simpler (and more easily secured) than sending the card details through the server, so we’re going to use the javascript method for this tutorial.
For our payment form to be processed, we need to load jQuery, the stripe.js file (which is provided by Stripe), and a custom jQuery file (that we will write in a moment) that is used to send the payment details to Stripe. We also need to place our publishable API key (either test or live, depending on our mode selected in settings) into a global variable so that our stripe-processing.js file can read it.
This function goes into scripts.php:
1 2 3 4 5 6 7 8 9 10 11 12 13 14 15 16 17 18 19 20 21 22 | <?php function pippin_load_stripe_scripts() { global $stripe_options; // check to see if we are in test mode if(isset($stripe_options['test_mode']) && $stripe_options['test_mode']) { $publishable = $stripe_options['test_publishable_key']; } else { $publishable = $stripe_options['live_publishable_key']; } wp_enqueue_script('jquery'); wp_enqueue_script('stripe', 'https://js.stripe.com/v1/'); wp_enqueue_script('stripe-processing', STRIPE_BASE_URL . 'includes/js/stripe-processing.js'); wp_localize_script('stripe-processing', 'stripe_vars', array( 'publishable_key' => $publishable, ) ); } add_action('wp_enqueue_scripts', 'pippin_load_stripe_scripts'); |
JS Processing of the Payment Form
When a user fills out the payment form and clicks submit, the card details they entered are sent to Stripe for validation. If there is an error, the error is displayed in the div.payment-errors element. If there are no errors, then a “token” is created. This token contains all of the information necessary for charging a user’s credit card via PHP and is submitted to the server.
Our stripe-processing.js file looks like this:
1 2 3 4 5 6 7 8 9 10 11 12 13 14 15 16 17 18 19 20 21 22 23 24 25 26 27 28 29 30 31 32 33 34 | Stripe.setPublishableKey(stripe_vars.publishable_key); function stripeResponseHandler(status, response) { if (response.error) { // show errors returned by Stripe jQuery(".payment-errors").html(response.error.message); // re-enable the submit button jQuery('#stripe-submit').attr("disabled", false); } else { var form$ = jQuery("#stripe-payment-form"); // token contains id, last4, and card type var token = response['id']; // insert the token into the form so it gets submitted to the server form$.append("<input type='hidden' name='stripeToken' value='" + token + "'/>"); // and submit form$.get(0).submit(); } } jQuery(document).ready(function($) { $("#stripe-payment-form").submit(function(event) { // disable the submit button to prevent repeated clicks $('#stripe-submit').attr("disabled", "disabled"); // send the card details to Stripe Stripe.createToken({ number: $('.card-number').val(), cvc: $('.card-cvc').val(), exp_month: $('.card-expiry-month').val(), exp_year: $('.card-expiry-year').val() }, stripeResponseHandler); // prevent the form from submitting with the default action return false; }); }); |
Note that the payment form is only actually submitted once Stripe has verified that the credit card details are valid. When the form is submitted, the posted data will look like this (for interpretation by PHP):
- action=stripe
- redirect={url of current page}
- stripe_nonce={unique nonce key for extra verification}
- stripeToken={unique token returned from the Stripe API for our customer’s card}
All of this information is now ready to be processed via PHP. This is the point that the customer’s card is actually charged.
Processing the Payment with PHP
The stripe.js file created a “token” for us, which is basically a unique key generated by Stripe that contains all of the necessary information about the credit card to process a transaction. All we need to do in order to charge the customer’s card is setup a function that listens for the stripe action and then fires a Stripe API call when the action is called.
This function goes inside of process-payment.php:
1 2 3 4 5 6 7 8 9 10 11 12 13 14 15 16 17 18 19 20 21 22 23 24 25 26 27 28 29 30 31 32 33 34 35 36 37 38 39 40 41 42 | function pippin_stripe_process_payment() { if(isset($_POST['action']) && $_POST['action'] == 'stripe' && wp_verify_nonce($_POST['stripe_nonce'], 'stripe-nonce')) { global $stripe_options; // load the stripe libraries require_once(STRIPE_BASE_DIR . '/lib/Stripe.php'); // retrieve the token generated by stripe.js $token = $_POST['stripeToken']; // check if we are using test mode if(isset($stripe_options['test_mode']) && $stripe_options['test_mode']) { $secret_key = $stripe_options['test_secret_key']; } else { $secret_key = $stripe_options['live_secret_key']; } // attempt to charge the customer's card try { Stripe::setApiKey($secret_key); $charge = Stripe_Charge::create(array( 'amount' => 1000, // $10 'currency' => 'usd', 'card' => $token ) ); // redirect on successful payment $redirect = add_query_arg('payment', 'paid', $_POST['redirect']); } catch (Exception $e) { // redirect on failed payment $redirect = add_query_arg('payment', 'failed', $_POST['redirect']); } // redirect back to our previous page with the added query variable wp_redirect($redirect); exit; } } add_action('init', 'pippin_stripe_process_payment'); |
There really is not much going on inside of this function that is overly complex.
At the very top we first check to make sure that the function is only run when the $_POST[‘action’] variable is set, and that it equals stripe. We also confirm that our nonce verifies. This is to help improve security, which is very, very important when processing credit cards, even though we are not actually processing the card numbers themselves.
Once we have verified that we are supposed to be processing a transaction, we load up the global $stripe_options variable, and also load the Stripe libraries that we downloaded at the very beginning of this tutorial.
After we have loaded the Stripe libraries, we set the $token variable equal to the $_POST[‘stripeToken’] variable. This is just to make things a little easier to follow.
Next we perform a simple check to see whether the plugin is being used in test mode.
As soon as we have setup the $secret_key variable, we attempt to create a charge using the the Stripe_Charge::create() function. If the charge succeeds, then we set the $redirect variable equal to the permalink of the page we posted the form from with an added “payment=paid” query argument.
If our charge fails, then an exception is caught and the $redirect variable is set equal to the permalink of the previous page with an added query argument of “payment=failed”.
At the very bottom we simply redirect back to the page with the payment form. If the payment was successful, the user will see the confirmation message. If it failed, they will see the form again. This could obviously be improved to show an error message.
And that’s it! Our simple Stripe payment form is now complete and we can begin accepting payments.
Testing the Payment Form
Obviously once you have built something like this, you want a way to test that it fully works without creating actual charges that cost you (or someone else) real money. Thankfully, Stripe has a magnificent testing system that allows you to perform just about any kind of test you want.
To test your payment form, follow these steps:
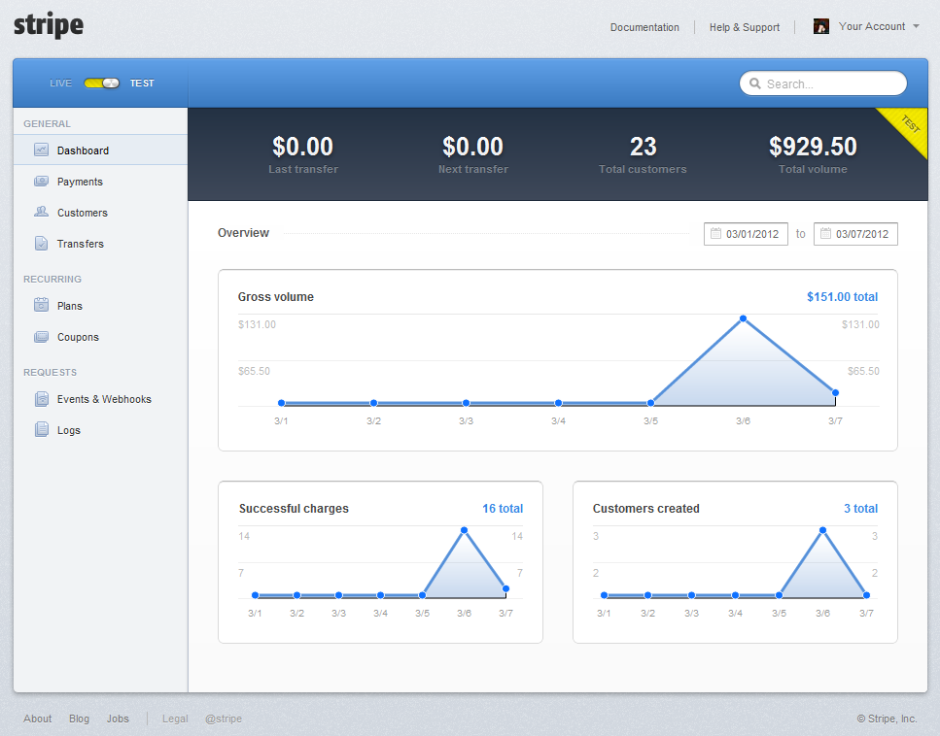
1. Put Stripe into test mode using “Test Mode” toggle switch in the top left:
2. Get your test API keys and enter them in your WordPress Stripe Settings options page. Make sure that you check the box for “Test Mode”.
3. Enter the following credit card details in the payment form:
- Card number: 4242424242424242
- CVC: 222 (can be any 3-digit number)
- Expiration: 12 / 2015 (can be any date in the future)
4. Hit Submit payment
5 Go to your Stripe account and click Payments. You should now be presented with a list of all recent payments, and it will look something like this:
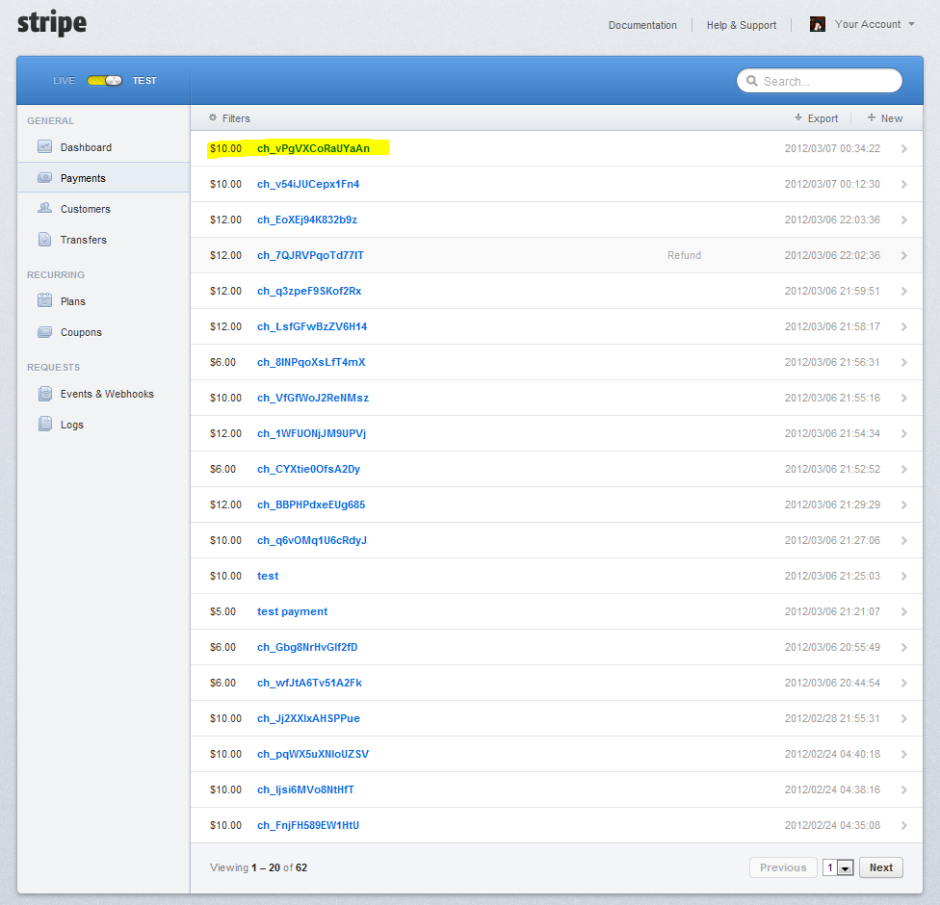
That’s it! As long as the payment you just made is included in the list, everything worked perfectly. This means that you can safely take the plugin out of Test Mode and begin accepting real payments.
Download the Complete Plugin for Part 1
The complete plugin that has been written in this tutorial can be downloaded below.
[download id=”35″ format=1]
I hope you have enjoyed this tutorial.


I do agree with all of the concepts you have presented in your post.
They are very convincing and can certainly work.
Still, the posts are too brief for starters.
May just you please extend them a bit from subsequent
time? Thanks for the post.
Hi,
Thanks for this nice plugin.. I am trying to implement this in my website on localhost..but i am getting the following error:
“Fatal error: Class ‘Stripe’ not found in wordpress-stripe-integration\includes\process-payment.php on line 23”
Can you please help?
Thanks
It’s not working
The link to download the complete plugin is no longer there just the shortcode.