This entry is part 7 of 7 in the Writing Your First WordPress Plugins, Basic to Advanced Series
- How to Begin Writing Your First WordPress plugin
- Structuring Your First WordPress Plugin
- Writing Your First WordPress Plugin Part 3
- Writing Your First WordPress Plugin Part 4
- Writing Your First WordPress Plugin Part 5
- Writing Your First WordPress Plugin Part 6
- Writing Your First WordPress Plugin Part 7 – Final
Part seven of Writing Your First WordPress Plugin concludes the series by demonstrating how to extend the plugin options that I showed you in part 6, and how to use them to control various aspects of your plugin’s output, such as turning it on or off and changing theoutput’s theme. There is not a lot of new material covered in this part, but a couple of key points are explained that will greatly assist you writing WordPress plugin option pages.
The first thing added to the plugin, is a checkbox in the options page to turn the output on or off. So rather than simply forcing our users to display the Twitter link, we give them an option of disabling it if they want. The following code in our “admin-page.php” file will add the necessary checkbox:
<input id="mfwp_settings[enable]" type="checkbox" name="mfwp_settings[enable]" value="1" checked="checked" /> <label class="description" for="mfwp_settings[enable]"><?php _e('Display the Follow Me on Twitter link', 'mfwp_domain'); ?></label> |
To me, it makes the most sense to place the checkbox just above the input field where we ask the user to enter their Twitter URL. Now, we must check whether the checkbox has been marked in our “display-functions.php” file. Doing so is simple, just add a second condition to our is_singular() conditional statement:
if(is_singular() && $mfwp_options['enable'] == true) { // . . .. } |
Your user now has the option to enable or disable the Follow Me on Twitter box completely.
Now, in order to provide our user a couple of options in terms of the plugin output’s appearance, we should add a select drop down menu that allows the user to choose the “theme” of the output. Doing so is simple. In our “admin-page.php” file place this, just below the Twitter URL input:
<?php $styles = array('blue', 'red'); ?> <select id="mfwp_settings[theme]" name="mfwp_settings[theme]"> <?php foreach($styles as $style) { ?> <?php if($mfwp_options['theme'] == $style) { $selected = 'selected="selected"'; } else { $selected = ''; } ?> <option selected="selected" value="<?php echo $style; ?>"><?php echo $style; ?></option> <?php } ?> </select> |
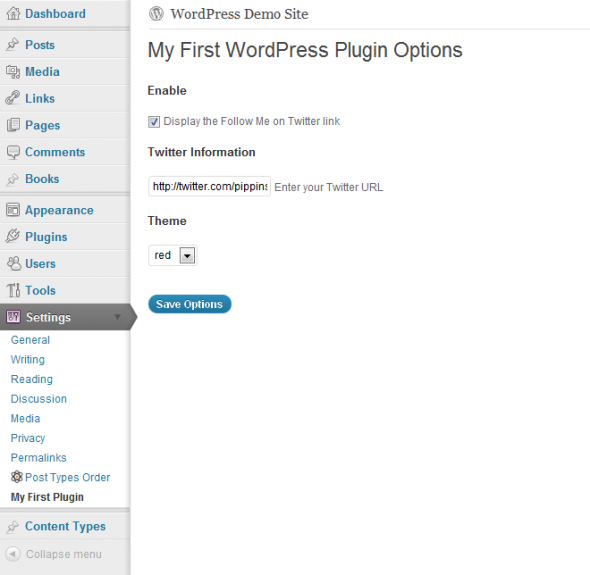
The logic behind this select menu is explained in the video, so I suggest watching it if you are confused by what is going on here. Your final plugin’s options page should look like this:
Next, since we have given the user a way to choose the theme, we need to output the selected theme in the plugin’s HTML. What we will do here is output the selected option as a CLASS in our paragraph tag. This is in “display-functions.php”:
$extra_content = ' |
Notice the $mfwp_options[‘theme’] after the “twitter-message” class name. The user’s chosen option will now be used as a class name, so now we can target it using plain and simple CSS, like so:
.twitter-message.blue { color: blue; border: 1px solid #ccc; } .twitter-message.red { color: red; border: 1px solid red; } |
And that does it! Your very first WordPress plugin is now complete!
To roundup, here are some of the important parts of writing WordPress plugins I have demonstrated in this series:
- Beginning your plugin
- Creating a organized and easy to read file structure
- Using WordPress Conditional Tags to control the output of your content
- Loading scripts and styles in WordPress plugins correctly
- Creating a plugin options page in your WordPress admin
- Creating different kinds of plugin options in your settings page
- Using your plugin’s options to control the output of your plugin
- . . . and how to write a WordPress plugin from start to finish
I hope you have found this series helpful, and I would really appreciate it if you would leave your feedback, comments, criticism, etc. If you enjoyed this series, and any of my other tutorials, and you’d like to see more like it, would you consider supporting the site?
If you’d like to test out the final plugin, or simply browse through its code, the download link is below.
Download Complete Plugin

Pippin, You are a really awesome man and I am a big follower of yours. I have checked all the video tutorials of WordPress Plugin; they are mind blowing.
I am a big fan of yours and I really appreciate you for your knowledge and sharing. I am WordPress Developer and I own “World Web Technology”, it’s Web design and development company. Our company also comes under top trusted consultant of EDD as WP Web.
I just wrote an article about WordPress Plugin Development and I think you may like. Please share your thoughts and reviews about it.
Once again, I would like to say thank you for the information. It’s truly valuable and full of knowledge.
Please can you reupload the project code again.
You are very very good man
Hi – I second that, the downloads are 404-ing which is a big shame because i would love to take a closer look.
thank you